Teach the Game
A script to read aloud: how you win Endeavor: Deep Sea, the Scenario sheet, your player mat and the ocean, a round, the end, every source of points and what each attribute and piece is for.
How you win
“We each run an ocean research institute. Over 6 rounds — about 20 minutes per player — we recruit Specialists, send our Vessels to explore, discover new zones of ocean, dive, protect habitats and publish Journals. We take nothing out of the sea: everything we gain makes us better at the work. Whoever has done the most good — the most points — wins.”
- You need: points — from your four attribute tracks, from Impact markers on the Scenario’s Impact board, from the Mission’s three goals, from some Journals and Senior tier-5 Specialists, and a few for leftovers.
- You get them by: recruiting a Specialist every round, then placing discs on your Specialists to Travel, Sonar, Dive, Conserve and Journal in the ocean. Those actions raise your attributes, give Impact and put discs in the ocean for the Mission goals.
The boards
Every game uses one Scenario sheet (the Mission): its setup, special rules, three scoring goals and the Impact board.
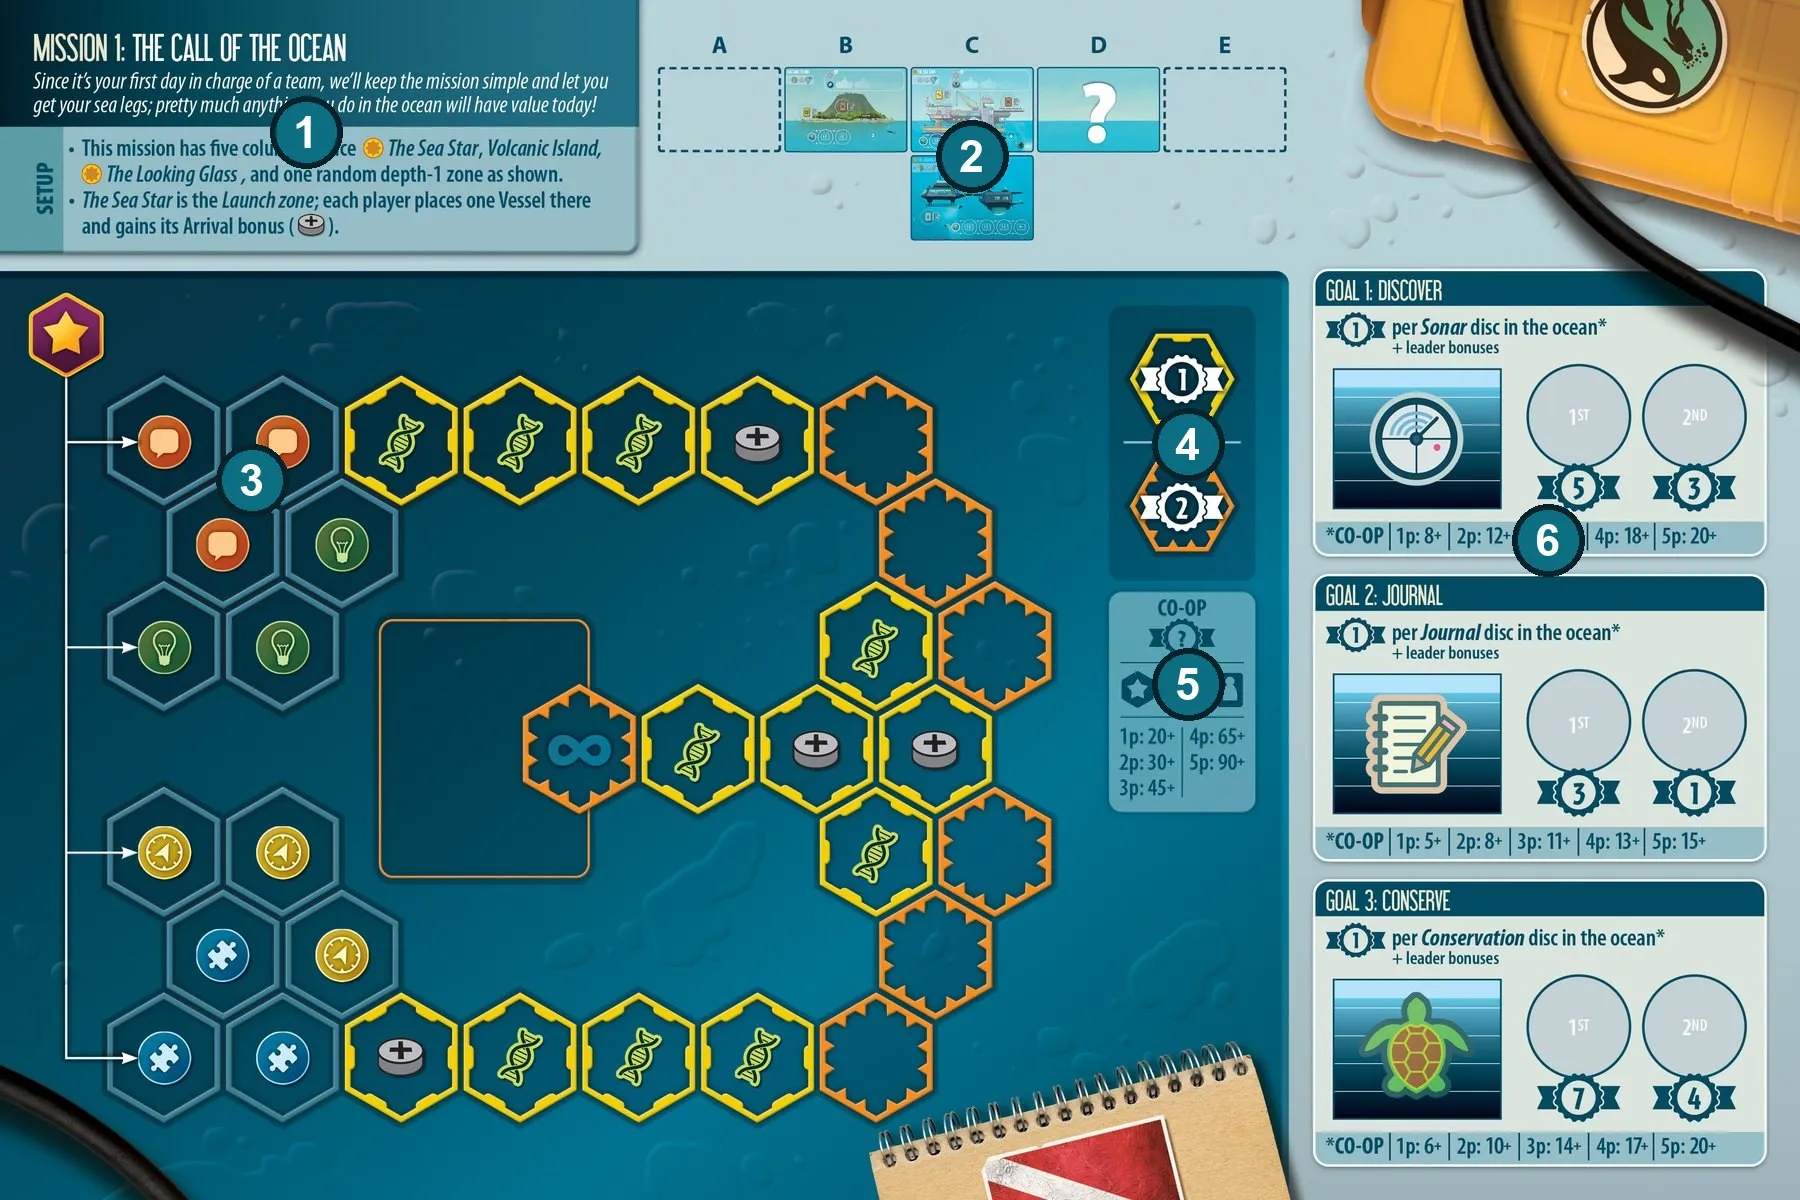
- Setup and special rules — which zones start in play and where Vessels launch.
- Ocean Board diagram — the starting zones and how wide the ocean may grow (columns A–E).
- Impact board — each Impact you gain places a marker here and takes the hex’s reward.
- Scoring legend — the hex colours that score 1 or 2 points at the end.
- Co-op goal — the points the team needs in co-op and solo.
- Mission goals — three goals with points per item and leader bonuses.
Each player has a player mat:
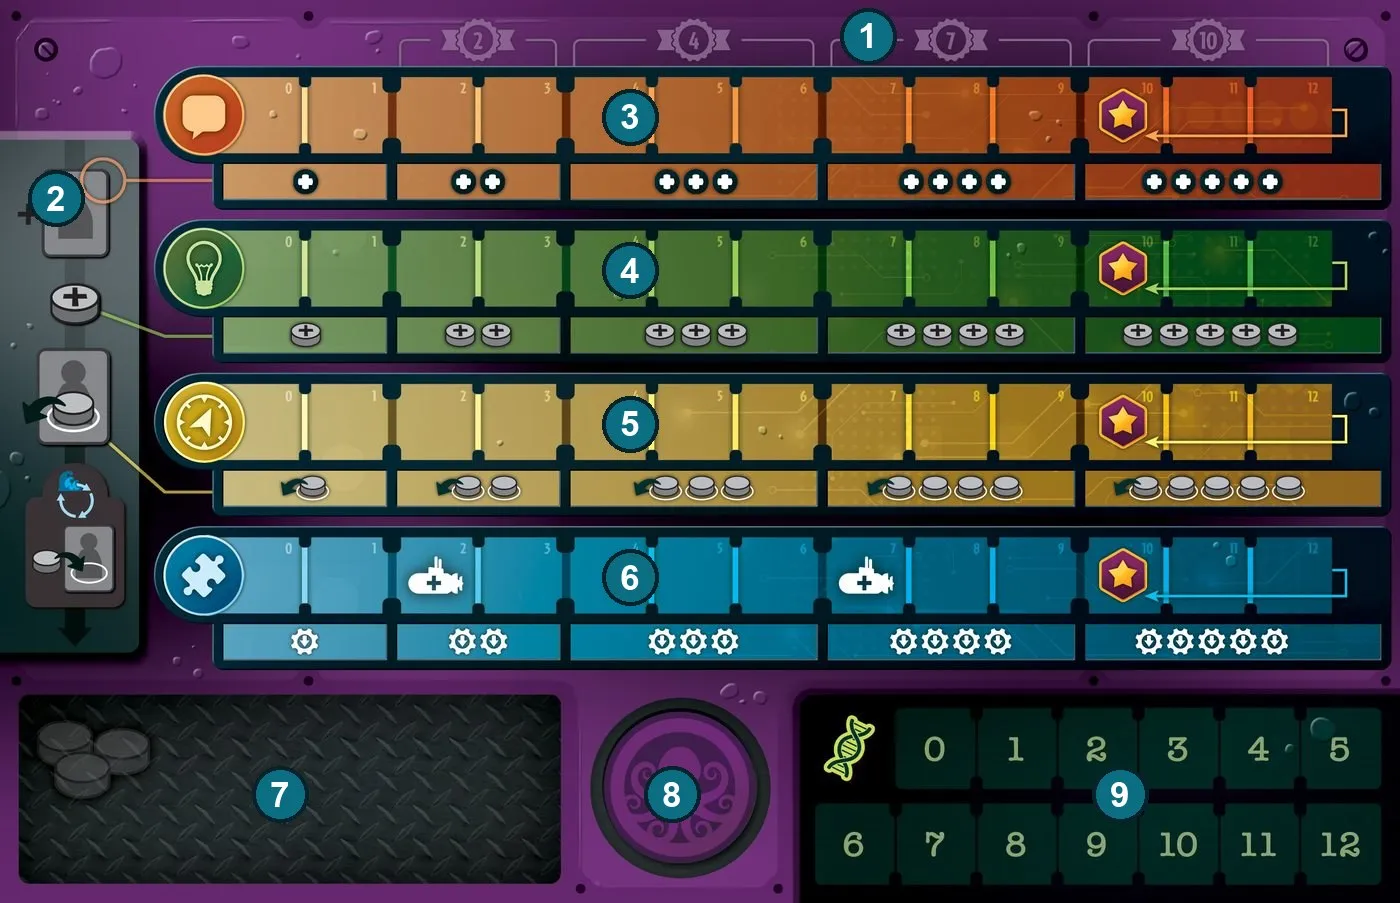
- Scoring brackets — 2, 4, 7 or 10 points for how far each track reached.
- Flow of play — the order of the Preparation steps, each linked to the track that drives it.
- Reputation track — its lower row is your Recruitment level: the highest Specialist tier you may recruit.
- Inspiration track — its lower row is your Effort level: discs you gain each round.
- Coordination track — its lower row is your Reassignment level: discs you take back from Specialists each round.
- Ingenuity track — its lower row is your Technology level (how far and how deep you Travel); spaces 2 and 7 give a new Vessel.
- Staging area — the discs you can use this round.
- Dive token storage — keep one Dive token between turns.
- Research track — up to 12 Research to pay for Conserve and Journal actions.
The ocean is built from Ocean boards; once in play a board is a zone:
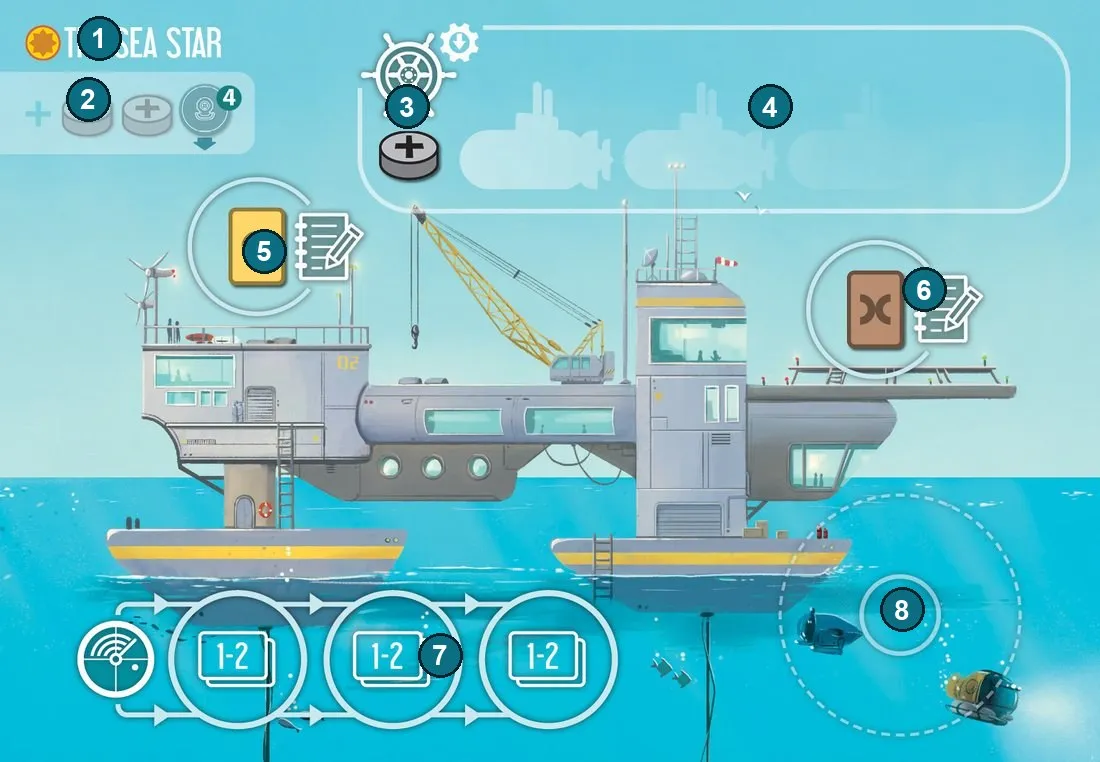
- Name and mission symbol — the sun symbol marks boards used only by certain Missions.
- Discovery bonus — taken once, by whoever discovers the zone.
- Arrival bonus — taken every time a Vessel ends a Travel here.
- Travel box — where Vessels stay; the gears show the zone’s depth.
- Journal site, yellow field — publish a Journal with that Field symbol.
- Journal site, brown field
- Sonar track — fill it left to right; most spaces Discover new zones.
- Dive site — a stack of Dive tokens (4 here).
A round
- Preparation — each player in turn, starting with the Wave, does all three steps (details):
- Recruit one Specialist up to your
 Recruitment level and take its immediate gains;
- Effort: take
 discs from your supply to your Staging area;
- Reassign: take
 discs back from your Specialists.
- Recruit one Specialist up to your
- Activation — from the Wave, one turn each round the table until all have passed. A turn: put a disc on a Specialist with an empty circle and do its action(s) (details).
| Action | What it does |
|---|---|
 Travel | Move a Vessel up to your  Technology level in zones and depth; take the Arrival bonus |
 Sonar | Second disc on a Sonar track; take its reward, often a  Discover of a new zone |
 Dive | Take the top Dive token:  Research or a free effect |
 Conserve | Pay its Research, second disc on a Conservation site; take its rewards (often  ) |
 Journal | Pay a Journal’s Research, second disc on a matching Journal site; take the card and its effects |
- End of the round — the Wave moves clockwise (details).
How the game ends
After round 6 (round 7 in solo) — when everyone has seven Specialists including the Team Leader. Score (details):
- each attribute track’s bracket (2, 4, 7 or 10);
- your markers in scoring hexes of the Impact board;
- Journals with points and Senior tier-5 Specialists;
- leftover Research plus Staging discs, ÷ 3;
- the three Mission goals with their 1st and 2nd place bonuses.
Highest score wins; a tie is a shared win.
Ways to score
| Source | How and when |
|---|---|
| Attribute tracks | At the end, each of     scores its bracket: 0, 2, 4, 7 or 10 |
| Impact board | At the end, each of your markers in a scoring hex (1 or 2 points in Mission 1; ∞ hexes hold any number) |
| Mission goals | At the end, points per disc, zone or symbol the goal counts, + leader bonuses for 1st and 2nd |
| Journals | At the end, the points printed on Journals you published |
| Senior tier-5 Specialists | At the end, the scoring on each Renowned Specialist you promoted |
| Leftovers | At the end, (Research on your track + on a stored Dive token + discs in your Staging area) ÷ 3, rounded down |
Nothing in the game takes points away.
What each resource is for
| Resource | Why you need it | How you get it | How you use it |
|---|---|---|---|
| Reputation | Better Specialists | Specialists, zones, links, Journals, Impact hexes | Its level is the highest tier you may recruit |
| Inspiration | More discs | Same | Its level is how many discs you gain each round |
| Coordination | Specialists ready again | Same | Its level is how many Specialists you reset each round |
| Ingenuity | Range, depth, Vessels | Same | Its level is how far and how deep you Travel; spaces 2 and 7 give Vessels |
 Discs | Every turn and every placed action | Effort, Reassignment, rewards | One to activate a Specialist; Sonar, Conserve and Journal need a second one |
| Research | Paying for Conserve and Journal | Dive tokens, zones, links, Impact hexes | Spent from your track (max 12) |
| Impact | Points and bonuses | Conserve sites, links, track ends, Journals, zones | Place a marker on the Impact board and take the hex |
| Specialists | Your actions | One recruited each round | A disc on a Specialist lets you do its action(s); promote to the Senior side for more |
| Vessels | Being in a zone | Start with 1; Ingenuity 2 and 7 | You can only act in zones where you have a Vessel |
| Dive tokens | Research or a free action | Dive | Spend any time on your turn; keep one |
| Journals | Promotions, points, new actions | Journal action | Effects for you and the others, points, or an action circle for later turns |
Teaching tips
- Start with Mission 1; it uses all five actions on a small ocean.
- Teach the icons once: a solid symbol is an action you take, the outlined symbol in a zone is where you take it.
- Make players keep their disc supply well away from their Staging area — supply discs are not available.
- Warn about the turn-one trap: without Coordination your Specialists stay blocked, and the engine stalls.