Player Board and Bonus Actions
Baghdad's player board — City tile rows and their bonuses, Houses, Architects, Boats and the Favour track — the bonus actions, the Wisdom area rewards and the Skill tiles.
Your player board
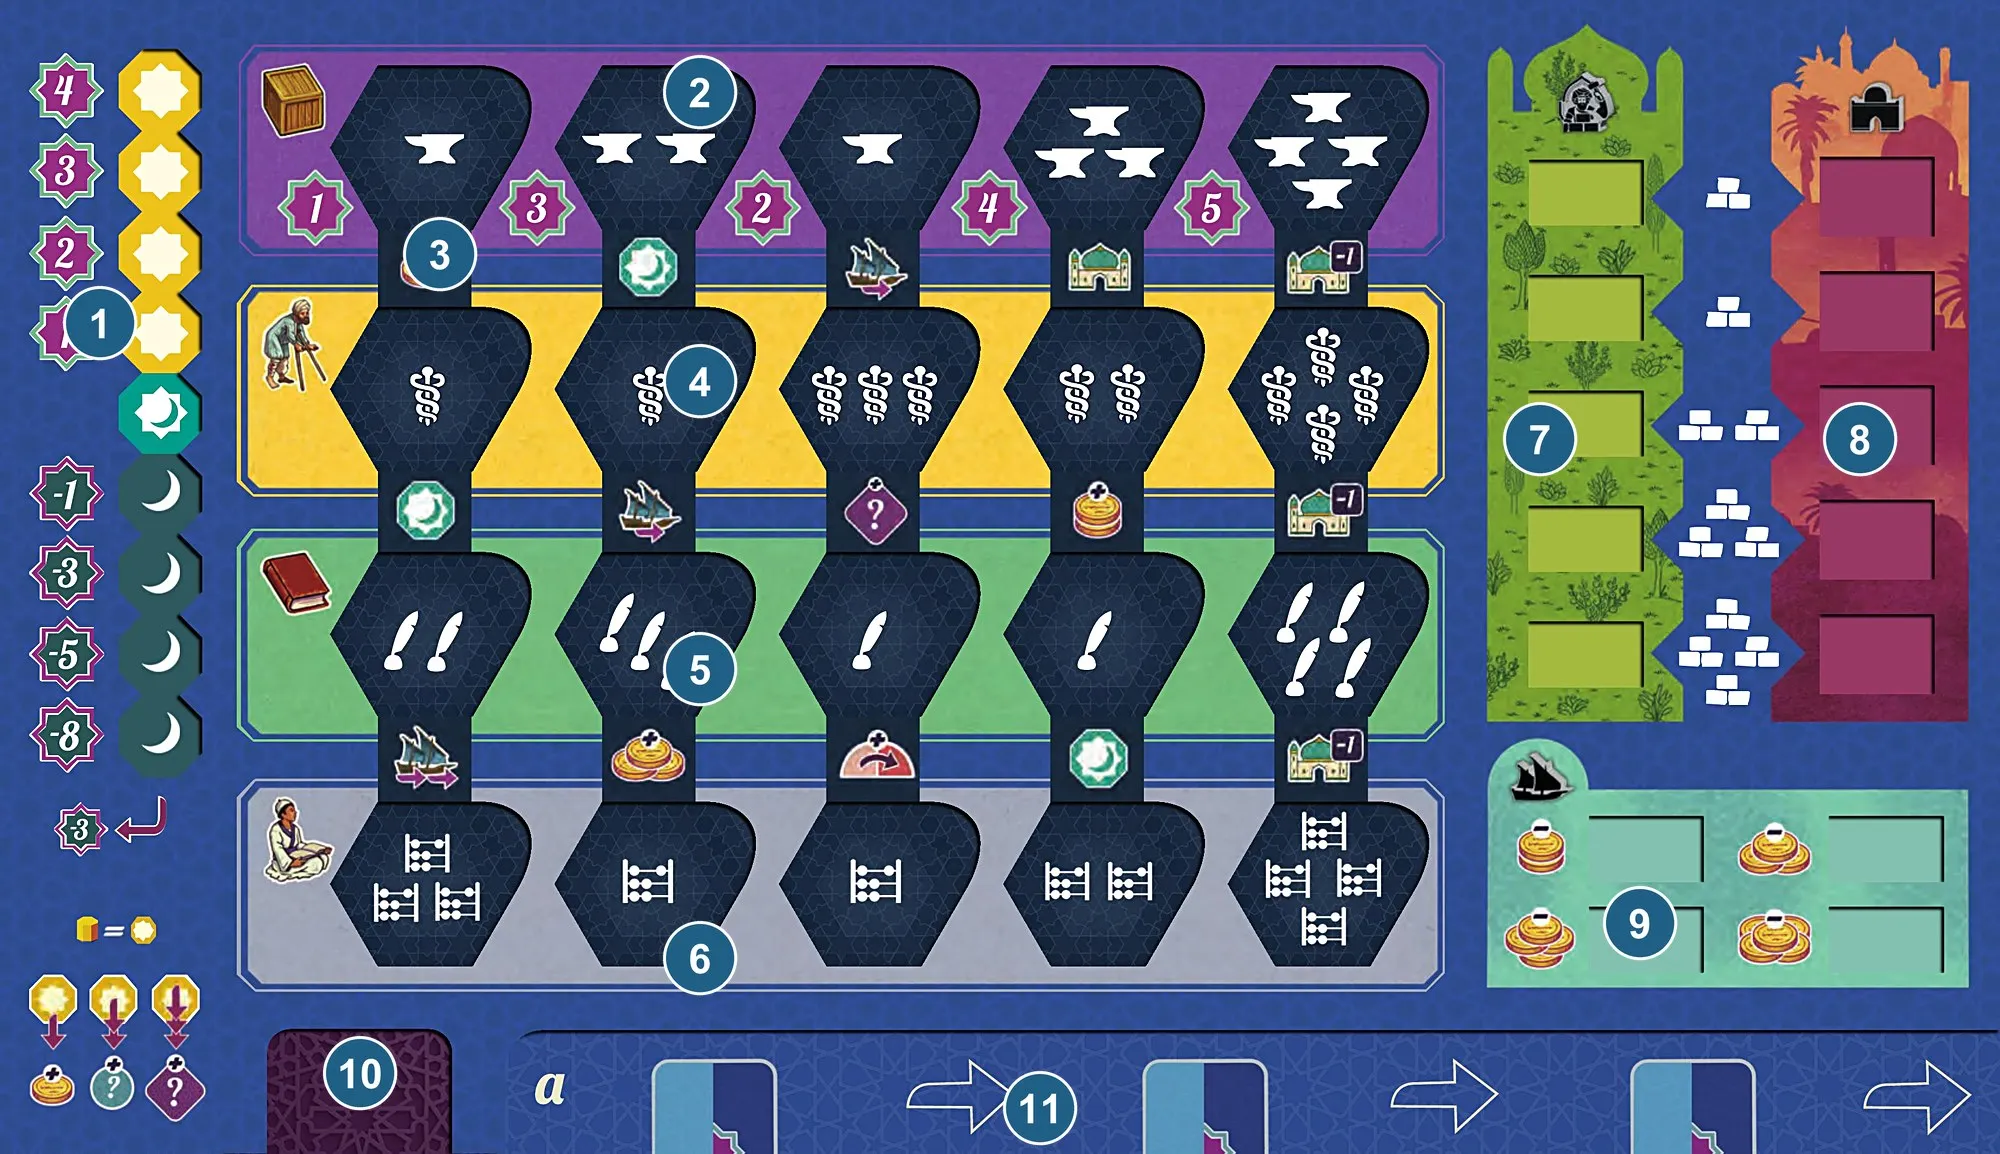
- Favour track — your Favour, and its points at the end
- City tile rows — here the Artefact row, with each spot’s skill requirement
- Bonus effects — between two rows: gained when the spots above and below are filled
- City tile rows — the Patient row
- City tile rows — the Book row
- City tile rows — the Student row
- Architects — five, sent to the Palace
- Houses — five, one on each of your Buildings; the Bricks between the two columns are what each Architect or House needs
- Boats — your four spare Boats and their prices
- Skill tile spot — where a Skill tile from the Wisdom area goes
- Card slots — your three Character cards, played on the left and sliding right
City tile rows
Each of the four rows holds one type of City tile: Artefacts, Patients, Books and Students. The order of the rows and the number of icons each spot needs differ from board to board (a, b, c and d), and each board comes with its own three Starting cards. Put a tile on any free spot of its row whose requirement you meet (City Tile Action). The Artefact spots show the points each face-up Artefact scores at the end.
Bonus effects
The icons between two rows are bonuses: when a new tile leaves a tile both above and below one, gain
it. They include Coins, Favour, Goods, Boat moves, Step and Wild tokens, and — between the last spots
of the rows —  Palace actions with
 one Bricks fewer. A Palace
action from a bonus works like stopping at a Palace site.
Favour and Shame
Your Favour marker starts on the middle space of the track, then moves up 1 space per Favour gained and down 1 per Favour lost or spent.
| Position | Points at the end |
|---|---|
| Top four spaces | +4, +3, +2, +1 |
| Starting space | 0 |
| Four spaces below | −1, −3, −5, −8 |
- At the top, a Favour you gain is wasted: spend some first.
- At the bottom, each Favour you would lose becomes a
 Shame token: −3 points each at the end.
Bonus actions
Take them at any point in your turn, even in the middle of a step, as often as you like.
Buy a Boat
Only when none of your Boats is on the river’s starting space. Pay the price under your cheapest spare
Boat (2, 3, 4 and then 5  ) and put it on the starting space.
Spend Favour
Only while your marker is above the starting space; the spending may take it below.
| Spend | Gain |
|---|---|
1  | 1 |
| 2 | 1 Goods token of any kind |
| 3 | 1  Wild token |
Spend a Wild token
During an action that needs skill icons, spend a Wild token: you count one more icon of a
type you choose. You may spend several on one action.
Spend a Student
During an action that needs skill icons, flip a Student that shows a skill icon to its blank side: you count one more icon of that type for this action. You don’t need that icon on your cards.
A Student with a  works only in the Move Boats step of a turn when your new card shows a
Boat icon: it adds one Boat move. It cannot start a Boat movement on its own, nor add to Boat moves
from a reward or Building.
Wisdom area rewards
Your second, third, fourth and fifth Books each put one of your Library tokens on the Wisdom area section for that number of Books. Choose one reward still open in that section, gain it, and cover it with the token face down. It is then closed to everyone.
| Book | Choose one |
|---|---|
| 2nd | Two Boat moves, split as you like · 2 · a  Step token and 1 · a Wild token |
| 3rd | A Skill tile |
| 4th | Take any Patient, Student or Artefact from the City (you still need the skill icons), or build a Building on any empty site (you still pay Coins and need  ) |
| 5th | As for the 4th Book, but ignore one skill icon of the requirement |
Tiles and Buildings from these rewards can come from anywhere in the City, and cost no tuition.
Skill tiles
Four Skill tiles start on the three-Book section of the Wisdom area:  ,
 ,
 and . Taking one with your third Book puts it in the bottom-left corner of
your board, and its space is covered with your Library token. For the rest of the game you have one
more icon of that type.