Zoo Map, Turns and Breaks
Your zoo map, a turn with the five Action cards, the Break track and the break steps.
Your zoo map
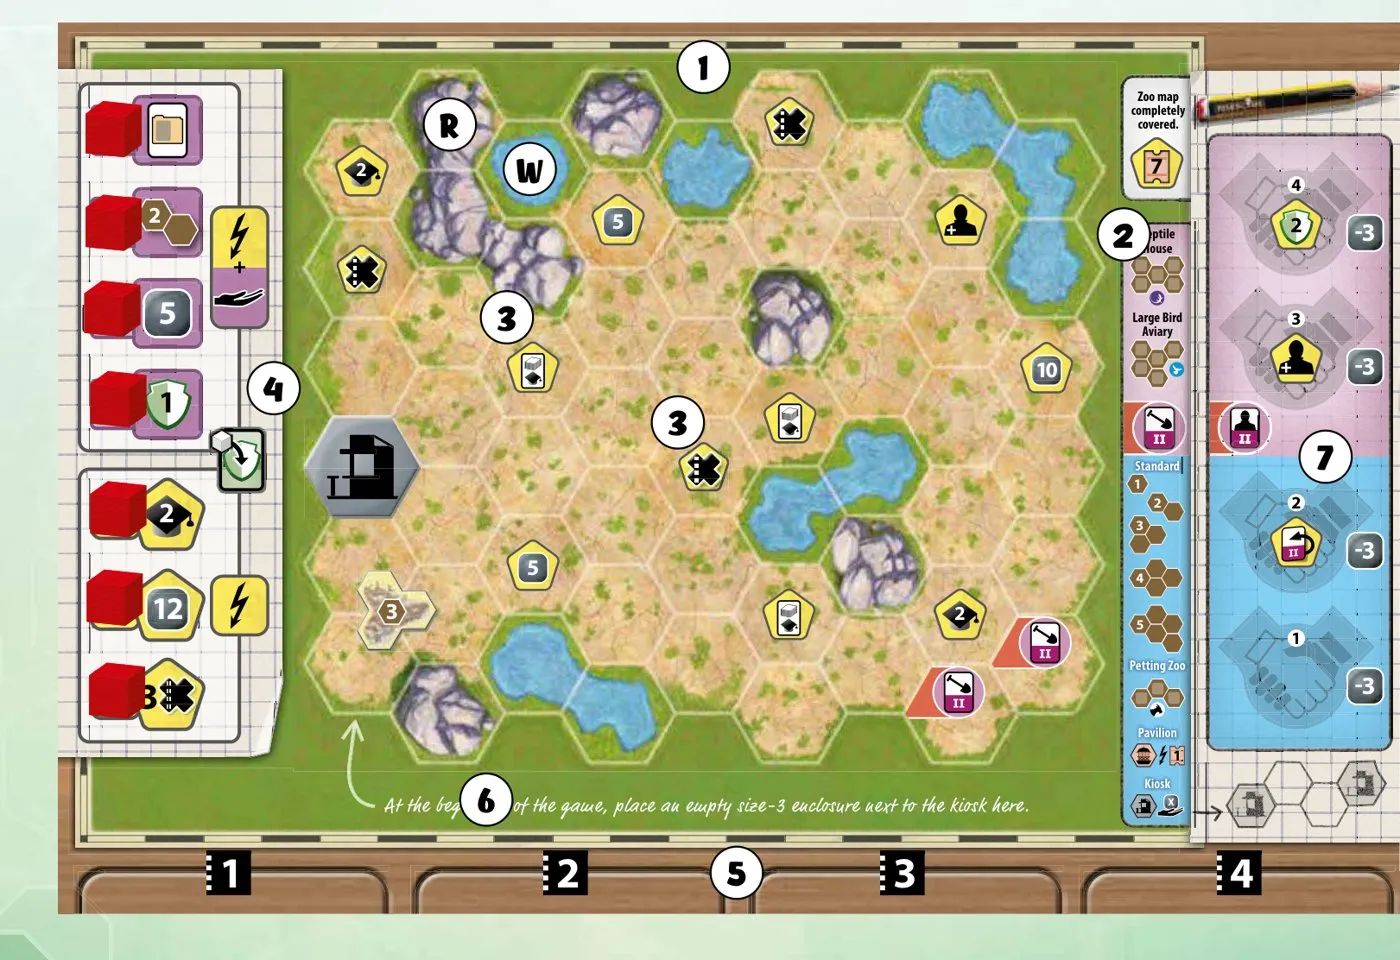
- Your zoo — the hex area where you build.
- Building overview — every building’s size and shape.
- Placement bonuses — covered once, they pay at once.
- Conservation bonuses — the 7 player tokens you move onto projects.
- Action card slots — strength 1 to 5.
- Special ability — what makes this map different.
- Partner zoos, universities and workers — filled from the bottom up.
Building spaces
Build on any hex except rock  (R) and water
 (W) spaces; some animals
want their enclosure next to them. A built-on space is covered. Spaces marked with the upgrade symbol
can only be built on once your Build card is on side II.
Placement bonuses
A space with a bonus pays it the moment you cover it, once. The icon overview explains each one.
Map A and the other maps
[Map Pack 2] Maps 11–14 and Tournament Map 1 have their own page: Zoo Map Pack 2.
Map A (four identical copies) is the first-game map: it starts with a 3-space enclosure, empty side up, on the marked spaces, and the kiosk printed on it counts as built. Map 0 is a slightly easier set for a second game. The other sides (Maps 1–8) each have their own special ability.
On the right edge you add partner zoos  and universities
 from the bottom space up, taking any bonus printed on the space. A third partner zoo needs the upgraded
Association card. The spare association workers
 lie there too; each one you hire stands
up on the notepad, where you also keep your money and X-tokens.
A turn
There are no rounds: players take one turn each, clockwise, until the end. On your turn:
- Choose one of the 5 Action cards under your zoo map. Its strength
 is the number
of its slot (1 at the left, 5 at the right).
- Add X-tokens
 if you like: +1 strength each. Decide before you start; tokens gained
during the action can’t be added to it.
- Do the action (The Five Action Cards). You may not choose to do nothing (play 0 animals, build 0 buildings).
- Put the card in slot 1; the cards that were left of it slide one slot right.
- Effects that say after finishing happen now, after the card has moved.
You can never hold more than 5 X-tokens.
The Break track
The Break token starts on the space for your player count. Cards, Sponsors and many animal abilities move it forward. When it reaches the last space, you take 1 X-token and a break happens after your turn (extra steps are ignored). After the break the token goes back to the start.
Break
Everyone, in order:
-
Hand limit: discard down to 3 cards (5 with the hand-limit university
 ).
-
Tokens on Action cards: Multiplier, Venom and Constriction tokens go back to the supply.
-
Association board: your workers come home and are active again. Refill the board so one partner zoo of each continent and one university of each kind is available (skip ones every player already has).
-
Display: discard the cards in folders 1 and 2, slide the rest down and refill.
-
Income:
- money for your appeal (printed next to your counter on the Appeal track; at 7 appeal, 11 money);
- 1 money per building next to each kiosk
 : unique buildings, special enclosures,
occupied standard enclosures and pavilions (an empty standard enclosure pays nothing);
- every income icon on your Sponsors and on the zoo-map bonuses you have uncovered.
When an income effect lets someone take display cards, players take income clockwise from the one who called the break, refilling the display after each.
-
Break track: the Break token goes back to its start space.
Conservation track bonuses
- 2 points: upgrade one Action card or hire an association worker — every player who reaches it.
- 5 and 8 points: take 5 money or one of the 2 Bonus tiles beside the space (a taken tile is removed; the money is always there).
- 10 points: the first time anyone reaches 10, every player discards one of their 2 Final Scoring cards. If nobody does, everyone discards one before final scoring.
These bonuses only happen during the game, not when final scoring pushes you past them.