Teach the Game
A script to read aloud: how you win The Gallerist, the game board and player board, a turn with kicked-out actions, the end, every source of money and what each resource is for.
How you win
“We are gallerists — part art dealer, part museum curator, part artists’ manager. In about 30 minutes per player, we discover artists, buy their work while they are unknown, make them famous and sell high, and draw visitors to our galleries. Whoever has the most money at the end wins.”
- You need: money — from sales, from works still on your walls at the end, and from end-game goals.
- You get it by: buying works cheaply (commissions!), raising their Artists’ Fame, selling through contracts, and placing Assistants in the International Market for majorities, the auction and Reputation tiles.
The boards
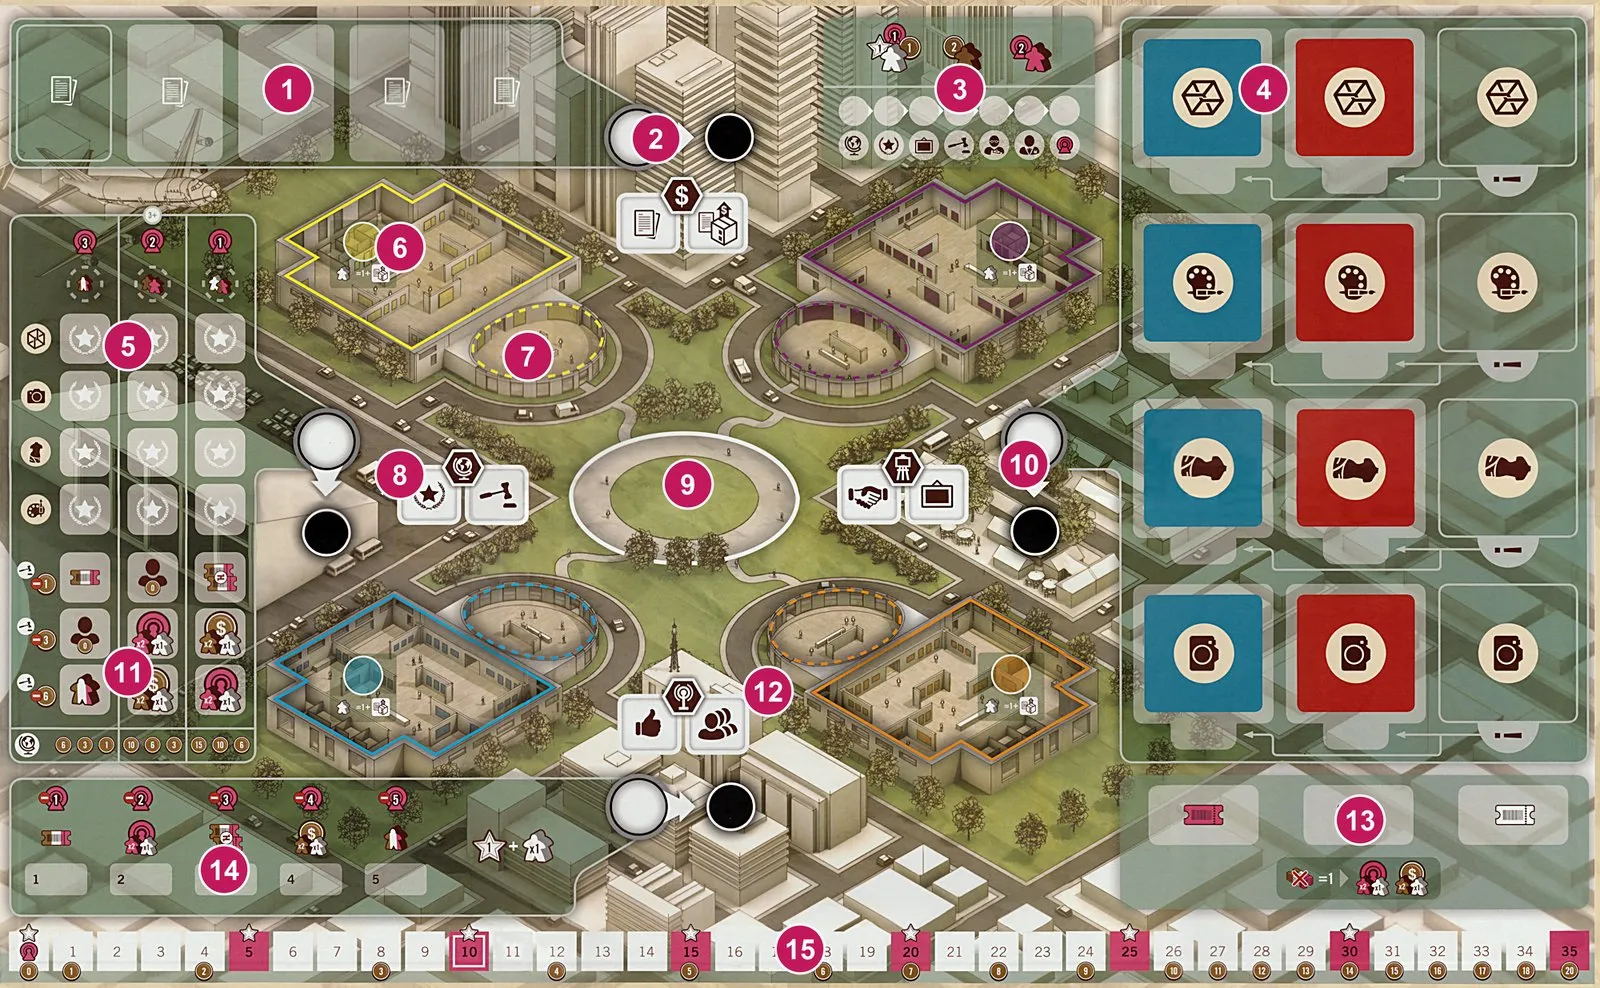
- Contract display — four contracts to take, with the deck on the left.
- Sales Office — Location: sign a contract or sell a work.
- Scoring reminders — the intermediate scoring and the order of the endgame scoring steps.
- Artists and their works — one blue and one red Artist per art form, with their stack of Works of Art.
- International Market — Reputation tiles in the upper rows.
- A player’s Gallery — where Visitors pay off.
- Lobby — between Plaza and Gallery; it grants International Market access.
- International Market — Location: take a Reputation tile or make an offer.
- Plaza — where Visitors wait.
- Artists Colony — Location: discover an Artist or buy a work.
- Auction rows — offers of 1, 3 or 6, with bonuses and the column majorities below.
- Media Center — Location: hire Assistants or promote an Artist.
- Box office — the tickets; an empty stack triggers the intermediate scoring.
- Promotion tokens — levels 1 to 5 and their bonuses.
- Influence track — Fame and money icons, and the endgame payout.
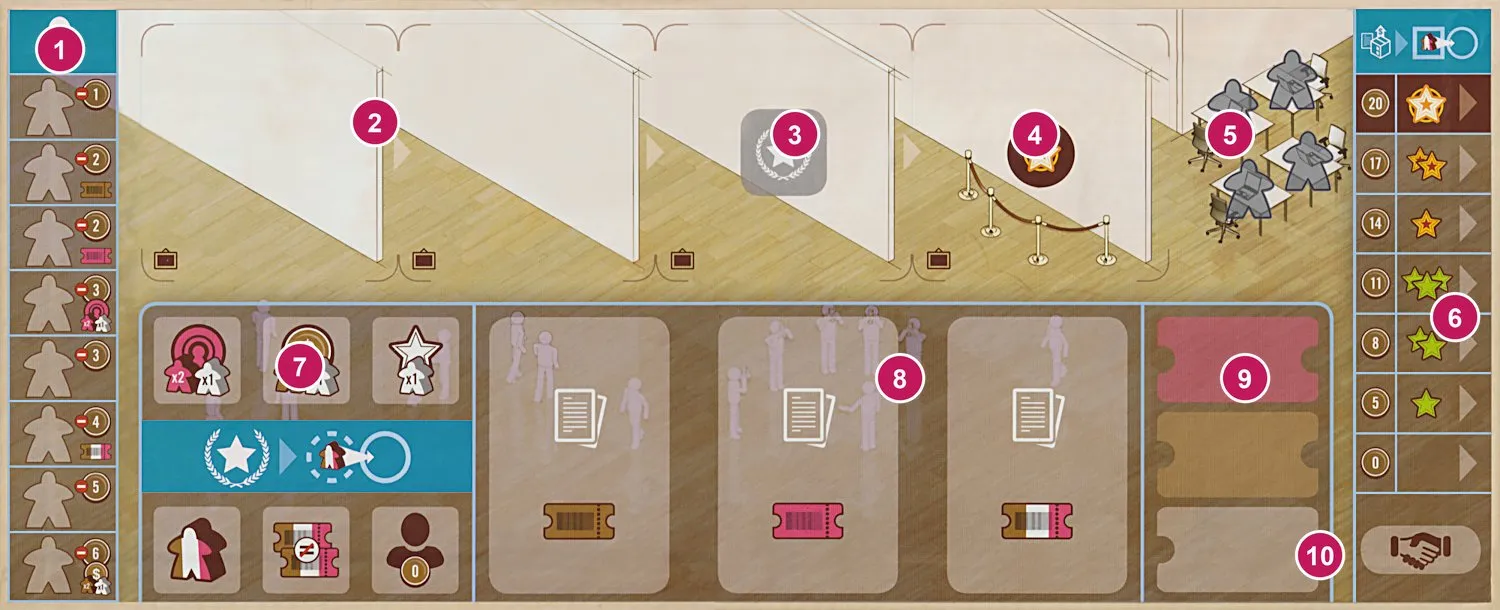
- Unemployment queue — Assistants to hire, cost and bonus beside each.
- Gallery slots — the works you exhibit.
- Starting Reputation tile slot — the 3rd slot, holding your first Reputation tile.
- Masterpiece slot — the 4th slot, open while you exhibit a Masterpiece.
- Office — four desks for available Assistants.
- Art value track — Signature tokens show what your works sell for.
- Reputation spaces — six bonuses, covered by Reputation tiles.
- Contract slots — up to three contracts; the first contract on each slot gives its ticket.
- Tickets — your supply of pink, brown and white tickets.
- Commission space — the Signature token of the Artist you discovered.
A turn
- Move your Gallerist to another Location; you may leave an Assistant behind where you were (details).
- Take one of the two actions there:
| Location | Actions |
|---|---|
 Artists Colony |  Discover an Artist ·  Buy a work |
 Sales Office |  Sign a contract ·  Sell a work |
 Media Center |  Hire Assistants ·  Promote an Artist |
 International Market |  Reputation tile ·  Offer at auction |
- Before or after, one Executive action: spend tickets to pull Visitors towards your Gallery, or put an Assistant on a contract for its bonus (details).
- Anyone you landed on is kicked out: after your turn they take a Location action there by spending Influence, or an Executive action (details).
How the game ends
When two of three happen — the box office is empty of tickets, two Artists are Celebrities, the Visitor bag is empty — finish the round, then everyone takes one last turn without Kicked-out actions. Then score money (details). Ties: most works acquired, then most Visitors in your Gallery, then most Assistants in play.
Ways to score
| Source | How and when |
|---|---|
| Selling works | During the game: the work’s sales value, set by its Artist’s Fame (5 to 20) |
 Money bonuses | During the game: 2 per Investor and 1 per Collector in your Gallery |
| Celebrity | 5 money to whoever pushes an Artist to Fame 19 |
| Intermediate scoring | Once: 2 per Investor and 1 per Collector in your Gallery (plus Influence for VIPs and Collectors) |
 Market majorities | End: 6/3/1, 10/6/3 and 15/10/6 for most Assistants in each column |
| Reputation tiles | End: as printed on each tile |
 Exhibition | End: the sales value of every work still in your Gallery |
| Auction | End: a renowned work, paid at its value and helping a card |
 Curator card | End: 10 and 15 for collections you exhibit |
 Art Dealer card | End: 5, 10 and 10 for sets you sold |
 Influence | End: 0 to 20 money by your position |
| Spending | Buying works, hiring and auction offers cost money |
What each resource is for
| Resource | Why you need it | How you get it | How you use it |
|---|---|---|---|
 Money | It is the score, and it buys works, Assistants and offers | Sales, money bonuses, Celebrities, endgame | Pay costs; Influence can top it up |
| Influence | Promotions, Kicked-out Location actions, extra money and Fame | International Market actions, VIP and Collector bonuses | Move your disc back to a Fame or money icon |
 Fame | Raises the price of an Artist’s works | Buying their works, promotions, Collectors, Influence | Your works sell and score for more |
 Tickets | Move Visitors into your Gallery | Works you buy, contract slots, bonuses, hiring | Executive action: one step per ticket of the Visitor’s colour |
| Visitors | VIPs give Influence, Investors money, Collectors both plus Fame | Tickets and bonuses bring them from the Plaza | Their bonuses count only in your Gallery; your Lobby opens Market columns |
| Assistants | Block Locations, earn bonuses, win the Market | Hire them in the Media Center | Leave them behind, put them on contracts and in the Market |
| Contracts | You cannot sell without one | Sign them at the Sales Office | Sell a matching work; take their bonuses |
| Signature tokens | An Artist can have only two works out | One per work bought; a commission when you discover | Mark each work’s sales value; return it on a sale |
| Reputation tiles | Endgame money and an immediate bonus | International Market upper rows; your starting tile | Cover a Reputation space for its bonus; score the tile at the end |
Teaching tips
- Teach the money loop first: discover (commission) → buy cheap → promote → contract → sell high.
- Then the Visitors’ path — Plaza, Lobby, Gallery — and why each colour matters; the Collectors limit is the rule most often forgotten.
- Demonstrate a kick-out early: leaving Assistants behind and getting extra actions is the heart of the game.
- Keep the player aid handy: every action has a short, ordered list of steps.
Rehearse being kicked out
Put Yellow’s Assistant at the Sales Office and move Purple’s Gallerist there. Move the Assistant to the kicked-out space, then finish Purple’s entire turn before Yellow acts. Yellow may take an Executive Action, spend Influence back to the previous Fame icon for a Location Action, or decline. The Assistant goes home in every case.
Now repeat with Yellow moving onto Yellow’s own Assistant: it goes home, but Yellow gains no Kicked-Out Action.