Vatican Report and Excommunication
Lorenzo il Magnifico's Faith track and Vatican Reports in rounds 2, 4 and 6: the 3/4/5 Faith thresholds, supporting the Church for Victory Points, excommunication, and all 21 Excommunication tiles.
The Faith track
Your  Faith Points sit on a track from 0 to 15 below the Vatican. Each step shows the
Victory Points the Church pays when you support it from there:
| Faith step | 0 | 1 | 2 | 3 | 4 | 5 | 6 | 7 | 8 | 9 | 10 | 11 | 12 | 13 | 14 | 15 |
|---|---|---|---|---|---|---|---|---|---|---|---|---|---|---|---|---|
 paid | 0 | 1 | 2 | 3 | 4 | 5 | 7 | 9 | 11 | 13 | 15 | 17 | 19 | 22 | 25 | 30 |
Faith beyond 15 is lost.
The Vatican Report
Phase C happens only in rounds 2, 4 and 6 — the last round of each period. Each period needs a minimum Faith, marked on the track:
| Period | Report after round | Faith needed |
|---|---|---|
| I | 2 | 3 |
| II | 4 | 4 |
| III | 6 | 5 |
In turn order, each player checks their disc:
- Below the threshold: you are excommunicated. Put one of your cubes on this period’s Excommunication tile; its penalty applies to you for the rest of the game. Your Faith disc stays where it is.
- At or above it, you may choose:
- Support the Church: score the Victory Points under your disc, then move it back to 0. No penalty.
- Refuse: take the excommunication as if you were short, and keep your Faith Points.
Excommunication hurts for the rest of the game but lets you keep building Faith toward a bigger reward later.
The last report
At the end of round 6 a player below 5 Faith is excommunicated as usual — and then still scores the Victory Points of their Faith step and moves the disc to 0. Each period is judged on its own, so being excommunicated earlier never stops you supporting the Church later.
Full game: the Leader Sisto IV adds 5 Victory Points each time you support the Church. [HoR] Martin Lutero (Houses of Renaissance) cannot be excommunicated.
Excommunication tiles
One tile per period is drawn at setup and shown under the dome from the start, so everyone knows the price of failing. Penalties marked “1 fewer” hit every source — action spaces, cards, Personal Bonus Tile, Council Privileges — and count each card or source separately.
Period I
| Tile | Penalty |
|---|---|
 | Each time you gain  Military Points, gain 1 fewer. |
 | Each time you receive  coins, receive 1 fewer. |
 | Each time you receive  servants, receive 1 fewer. FAQ |
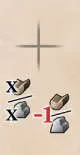 | Each time you receive  wood or  stone, receive 1 fewer — one of them, not both. FAQ FAQ |
 | Every  Harvest is worth 3 less (6 less in the large space). |
 | Every  Production is worth 3 less (6 less in the large space). |
 | Each coloured Family Member is worth 1 less when placed. |
Period II
| Tile | Penalty |
|---|---|
 | Every action to take a  Territory is worth 4 less. |
 | Every action to take a  Building is worth 4 less. |
 | Every action to take a  Character is worth 4 less. |
 | Every action to take a  Venture is worth 4 less. |
 | You may not place in the Market. |
 | Servants raise a value by 1 only for every 2 you spend. |
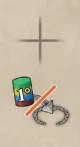 | You skip your first turn each round and place your last Family Member after everyone else. |
Period III
| Tile | Penalty at the end of the game |
|---|---|
 | Your Characters score nothing. |
 | Your Ventures score nothing. |
 | Your Territories score nothing. |
 | Before scoring, lose 1 for every 5 you have (26 points cost 5). |
 | Lose 1 for every Military Point you have. |
 | Lose 1 for every wood and stone printed in your Buildings’ costs. |
 | Lose 1 for every wood, stone, coin and servant left on your board. |
Timing questions
- Santa Rita doubles resources first; then the “1 fewer” penalty takes 1 off the total.
- A card’s immediate effect counts as one gain, even if it mixes resources and a privilege.
- You may not spend extra servants just to dodge the leftover-resources penalty.
[HoR] Houses of Renaissance adds one tile per period (new tiles); the New Excommunications promo adds three more.