Teach the Game
A script to teach Florenza: X Anniversary Edition at the table — how you win, the boards, a round, the end, every way to score and what each piece is for.
How you win
“Florence in the Renaissance. Each of us heads a great family — Medici, Pazzi, Pitti, Rucellai, Strozzi — and wants to be remembered as the city’s greatest patron of the arts. We send our Kinsmen to run workshops, gather marble, wood, metal, gold, spice and cloth, and hire Leonardo, Michelangelo, Raffaello and dozens more to make Artworks. Seven rounds, two to three hours. The most Victory Points wins — and almost all of them start as Prestige.”
What you need, and how you get it:
 Prestige comes mostly from completing Artworks — in your own Palazzo and
Chiesa, in the five Civic Buildings and in the Cathedral — plus the Artist’s bonus roll.
- To complete an Artwork you need Resources and Fiorini (the Artwork’s cost) and an Artist with the right skill (his fee).
- Resources and Fiorini come from your Workshops and the Market; Kinsmen are the workers who make all of it happen.
The loop: place Kinsmen on Workshops and Artworks → produce and build → pay for the Artworks → whoever leads in Prestige becomes Captain and banks it.
The boards
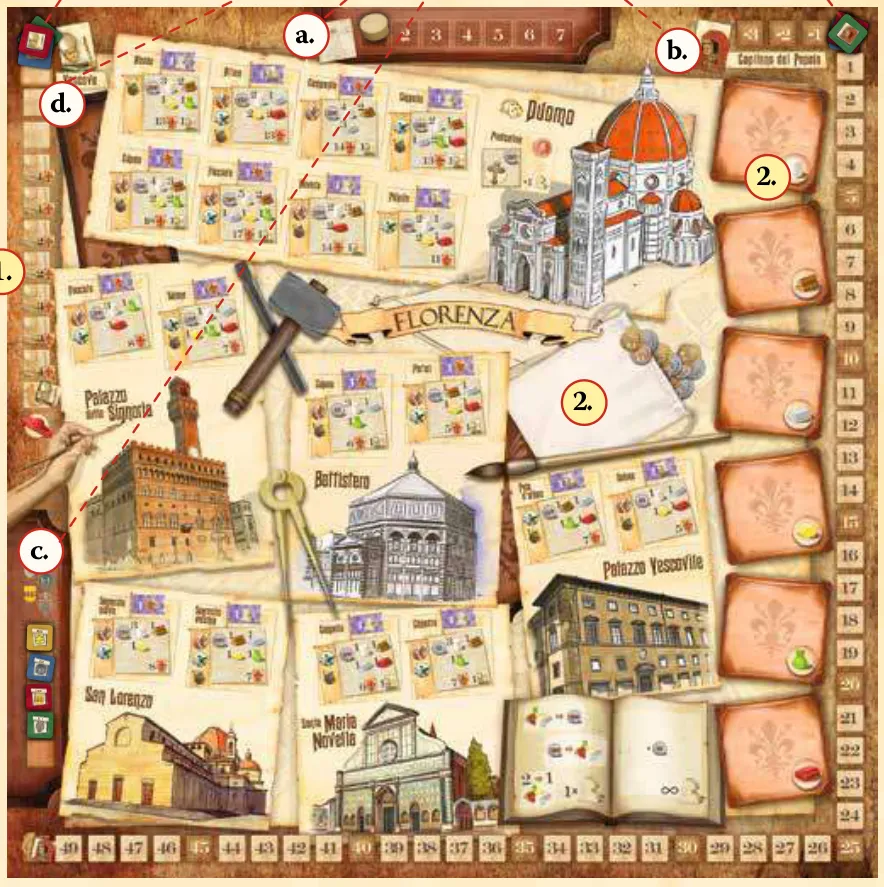
- The Cathedral (Duomo) — top: 8 Artworks, dearest and richest, two prestige rolls.
- Five Civic Buildings — Palazzo della Signoria, Battistero, Palazzo Vescovile, San Lorenzo, Santa Maria Novella: 2 Artworks each.
- The book — the Market and the Family Business spaces.
- Four tracks round the edge — rounds (a), Prestige (b), turn order (c),
 Church Influence (d). See the tracks.
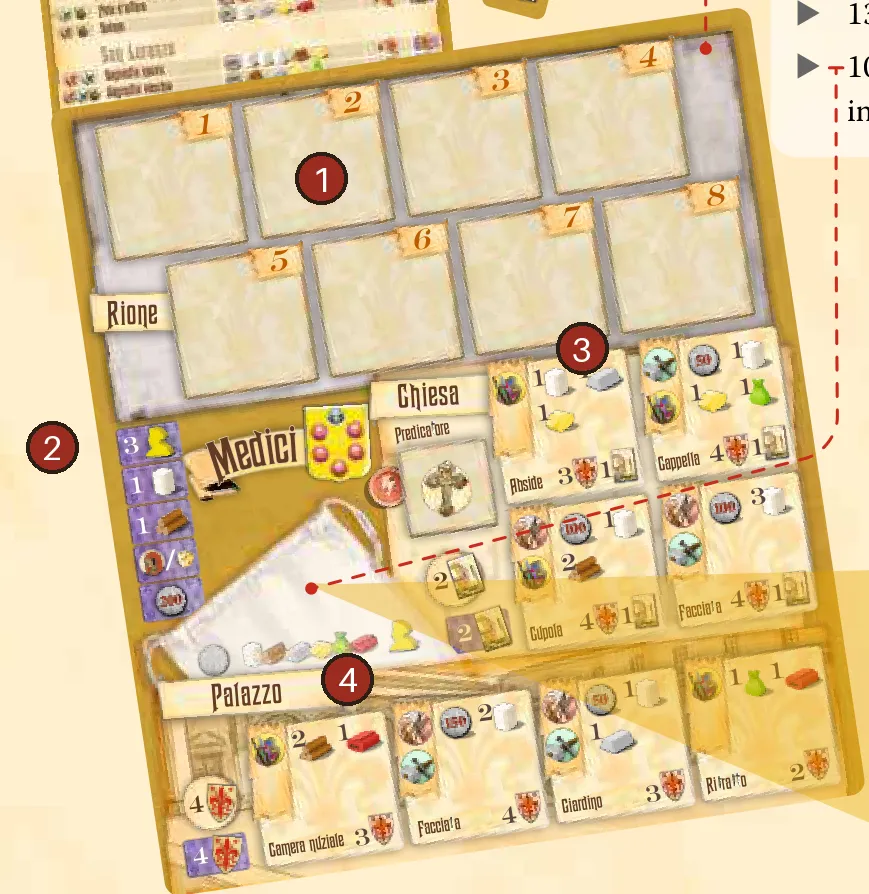
- Workshop spaces — eight numbered spaces; they act in number order.
- Base income — the purple column on the left.
- Chiesa — four Artworks and your own Predicatore space for Charity.
- Palazzo — four more Artworks.
Next to the board: the Life in Florenza row of six cards, with the Artists and Preachers in town under them — the further left, the sooner they leave.
A round
Seven rounds, eight phases each (full round):
- Income — 3
 Kinsmen, 200 Fiorini,
 Marble,
 Wood and a
third Resource, plus your Workshops’ and Artworks’ income.
- Captain may detain one Artist or Preacher for himself.
- Bishop takes a Kinsman from each rival’s pool and gains one.
- Kinsmen — one at a time in turn order, on the seven placements: operate or build a Workshop, hire an Artist for an Artwork, give Charity for more Kinsmen, the Market, the Family Business, a Captain of Fortune. Nothing is paid yet, except Charity.
- Economy — Workshops act space 1 for everyone, then space 2… Market, Family Business and Captains of Fortune whenever you like (Phase 5).
- Artworks — pay the Artwork and the Artist, score, roll for the Artist (Phase 6).
- Elections — top Prestige becomes Captain and banks it; top Church Influence (3+) becomes Bishop.
- Clean-up — characters age one card left; those under I leave.
How the game ends
After round 7. From your Captain marker, add your Bishop marker’s Prestige, 1 per 200 Fiorini (Resources count as 100 each), +3 for each office you hold, minus your District’s gaps, plus your Prestige tokens. Tie: most Resources, then most Fiorini (final scoring).
Ways to score
| Source | How and when |
|---|---|
| Artworks | The Prestige in the box, when you pay for it in Phase 6 |
 Artist prestige | Roll on his card — two rolls in the Cathedral, the Muse for one more |
| Palazzo complete | 4 at once, and again every round |
| Artwork and crest income | 1 , or a round per main-board Artwork; special crests add more |
| Rivals using your Workshops | +1 each time |
| Workshops | Rewards when built; Category 3 and 4 Workshops give points when used |
| Captains of Fortune | Fiorini → Prestige or Church Influence |
| Bishop | The Prestige on your Bishop marker’s space; Cardinal: + the number of players |
 Captain of the People | Banks your Prestige as hidden tokens |
| End of game | Bishop marker’s space, 1 per 200 Fiorini, +3 Captain, +3 Bishop |
| Losses | Using rivals’ Workshops −1; failed Artwork −1/−2/−3 (+1 with a named Artist); a Workshop you cannot pay for −1; end: −1 per empty Workshop space and uncompleted District Artwork, −4 for an empty Palazzo, −4 for an empty Chiesa |
What each resource is for
| Resource | Why you need it | How you get it | How you use it |
|---|---|---|---|
| Kinsmen | Every action | 3 a round, purple Workshops, Artworks, Charity, the Bishop | One per placement in Phase 4 |
 Fiorini | Artists’ fees, Artworks, Workshops, Charity, Captains of Fortune | 200 a round, Family Business, Workshops, selling | Paid in Phases 4–6 |
 Marble, Wood, Metal | Artworks and Workshops | Income (Marble, Wood), Workshops, Market | Paid in Phases 5–6 |
   Gold, Spice, Textile | Artworks and Workshops | Captain’s or die Resource, Workshops, Market | Paid in Phases 5–6 |
   Artists | Completing an Artwork | Hire one with a Kinsman in Phase 4 | His skill must match; fee in Phase 6 |
 Preachers | Extra Kinsmen this round | Charity, in your Chiesa or the Cathedral | Paid at once |
| Church Influence | Bishop, end-game Prestige | Chiesa Artworks, Workshops, Captains of Fortune | 3+ and most = Bishop |
| Family Crests | Mark Artworks; special ones add income | 10 normal, 3 special | One per completed Artwork |
Teaching tips
- Start with the Artwork: show one box and an Artist card — both costs are paid. Everything else feeds that moment.
- Stress timing: placing is free; you pay in Phase 5 or 6, and failing costs Prestige.
- Show Workshop order with a real example: space 1 for everyone before space 2.
- Explain banking: the Prestige leader becomes Captain, turns the track into hidden tokens and drops to 0, so the lead passes round the table. The −4 penalties for an empty Palazzo or Chiesa are the other thing new players forget.