Phase 6: Artwork
Completing Artworks in Florenza: paying the Artwork and the Artist, Family Crests, the Artist's prestige roll, the Muse, Masterpieces, failure penalties, Palazzo and Chiesa bonuses and Artwork income.
Completing an Artwork
Artworks are where most of your Prestige comes from. Starting with the first player and following turn order, each player resolves the Artworks they placed Kinsmen on in Phase 4, in any order they choose. For each one:
- Choose the skill if your Artist has more than one; it must suit the Artwork.
- Pay the Artist’s Fiorini cost for that skill and everything in the Artwork box — Resources and Fiorini.
- Score the
 Prestige and
 Church Influence in the box’s lower right
corner.
- Place a Family Crest on the box (below).
- Roll for the Artist’s prestige (below).
- Return the Artist tile to his card and the Kinsman to your pool.
Each Artwork can be completed only once: a box with a Family Crest is closed for the rest of the game. You choose the order and may decline; a declined Artwork is a failure and costs its listed penalty (FAQ).
Family Crests
- An Artwork in your District takes one of your normal Family Crests.
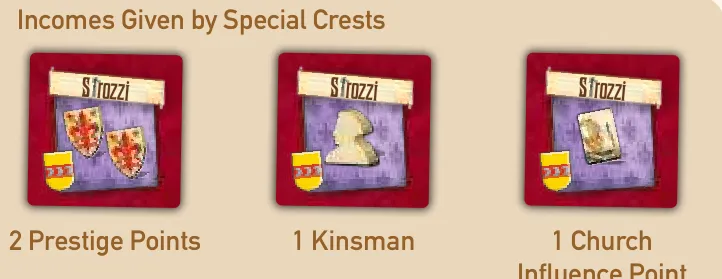
- An Artwork on the main board takes a normal crest or one of your three special crests,
each of which adds income every round: 2 , 1 or 1
 .
Artist prestige
Each Artist adds bonus Prestige Points. The bottom of his card (or of the Life in Florenza card for
an unnamed Artist) has a table with one line per skill and a column per  die result.
Roll the die and read the line of the skill you paid for.
- In the Cathedral, roll twice and keep the result you prefer.
- An unnamed Artist’s line runs −1, 0, 0, 0, 0, +1: a bad roll loses a point.
- [NoDie] Without the die, the result comes from where the Artwork is plus the Fiorini you add — see the No Die Variant.
Favor of the Muse
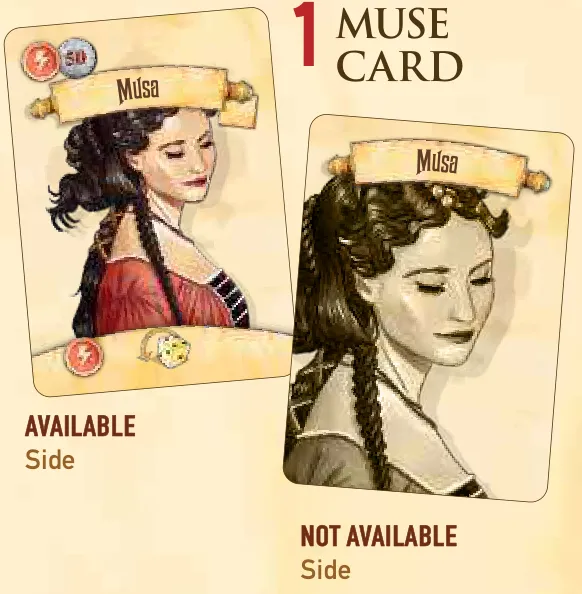
Not happy with the roll? Pay 50 Fiorini for the Muse and  roll once more (a third
time in the Cathedral), then keep the best result. She helps once per round, the first player to
ask: turn her card to Not Available until Phase 8.
Masterpieces
Every named Artist can paint, carve or build one Masterpiece. When your roll lands on a gold-coloured box of his table, score it and turn his card to its Completed Masterpiece side. He stays in the city but can never make another Masterpiece — not even with a different skill.
Failure
If you cannot — or do not want to — pay all the costs of an Artwork and its Artist, you pay nothing, the Artwork stays empty and you lose Prestige:
| Artwork in | Prestige lost |
|---|---|
| Your District | 1 |
| A Civic Building | 2 |
| The Cathedral | 3 |
| … and with a named Artist | 1 more |
Return the Artist tile and the Kinsman.
Palazzo and Chiesa complete
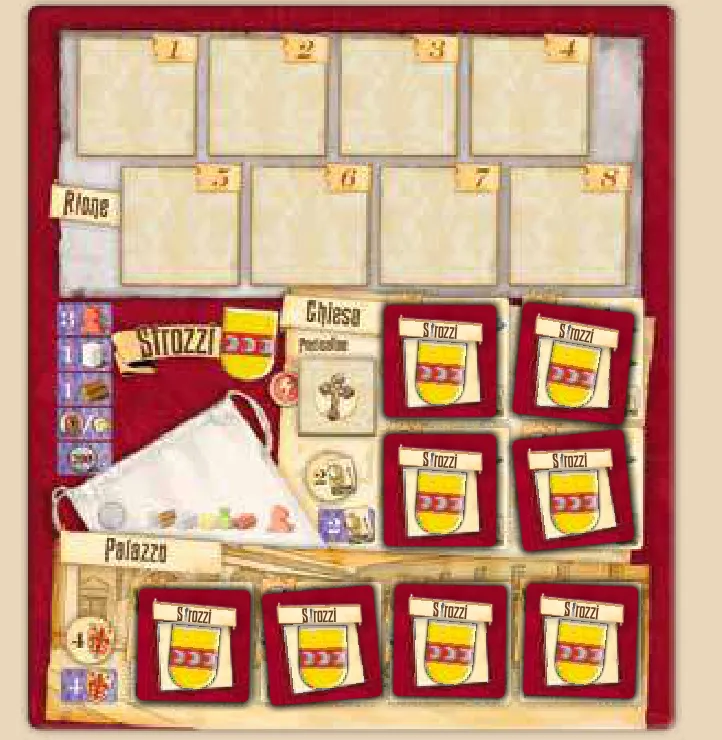
Your District has four Artworks in its Palazzo and four in its Chiesa, done in any order.
- All four in the Palazzo: 4 at once, and again every Phase 1.
- All four in the Chiesa: 2 at once, and again every Phase 1.
Income from Artworks
From Phase 1 of the next round, each completed Artwork on the main board pays what the flag over
its crest shows — 1 , 1 or 1 — plus the special crest’s
income if you used one. District Artworks pay only through the Palazzo and Chiesa bonuses.
The Artworks in your District
The same eight on all five District boards. A two-skill Artwork needs one Artist with either matching skill, and if you cannot pay the full Artist and Artwork cost, you spend nothing and take only the failure penalty (FAQ, FAQ).
| Artwork | Artist | Cost | Scores |
|---|---|---|---|
| Palazzo — Camera nuziale |  | 2  , 1  | 3 |
| Palazzo — Facciata |   | 150 Fiorini, 2  | 4 |
| Palazzo — Giardino | | 50 Fiorini, 1 , 1  | 3 |
| Palazzo — Ritratto | | 1  , 1 | 2 |
| Chiesa — Abside | | 1 , 1 , 1  | 3 1 |
| Chiesa — Cappella | | 50 Fiorini, 1 , 1 , 1 | 4 1 |
| Chiesa — Cupola | | 100 Fiorini, 1 , 2 | 4 1 |
| Chiesa — Facciata | | 100 Fiorini, 3 | 4 1 |
The Artworks on the main board
- The Cathedral (Duomo) — 8 Artworks, the most expensive and the richest; two prestige rolls.
- Five Civic Buildings — Palazzo della Signoria, Battistero, Palazzo Vescovile, San Lorenzo and Santa Maria Novella, two Artworks each.
Each box, as printed on the main board — one Artist with any one matching skill can do it. Pay the Artist cost for that skill plus the box costs; score the box rewards now and its flag income from the next round (FAQ):
| Building | Artwork | Artist | Cost | Scores | Income |
|---|---|---|---|---|---|
| Cathedral (Duomo) | Abside | | 200 Fiorini, 3 , 2 , 1 , 1 | 13 1 | 1 |
| Cathedral (Duomo) | Altare | | 150 Fiorini, 2 , 1 , 2 , 2 | 13 | 1 |
| Cathedral (Duomo) | Campanile | | 200 Fiorini, 4 , 2 , 3 | 14 1 | 1 |
| Cathedral (Duomo) | Cappella | | 200 Fiorini, 2 , 1 , 1 , 2 , 1 | 13 1 | 1 |
| Cathedral (Duomo) | Cupola | | 300 Fiorini, 4 , 3 , 2 , 2 | 18 1 | 1 |
| Cathedral (Duomo) | Facciata | | 300 Fiorini, 5 , 2 , 1 , 1 , 1 | 17 1 | 1 |
| Cathedral (Duomo) | Navata | | 250 Fiorini, 2 , 3 , 2 | 14 1 | 1 |
| Cathedral (Duomo) | Pulpito | | 150 Fiorini, 2 , 1 , 2 , 1 | 11 | 1 |
| Palazzo della Signoria | Facciata | | 150 Fiorini, 3 , 1 , 1 | 8 | 1 |
| Palazzo della Signoria | Salone | | 150 Fiorini, 1 , 1 , 1 , 1 , 1 | 7 | 1 |
| Battistero | Cupola | | 50 Fiorini, 3 , 1 , 1 | 6 1 | 1 |
| Battistero | Portali | | 150 Fiorini, 1 , 1 , 1 , 1 | 5 1 | 1 |
| Palazzo Vescovile | Pala d’altare | | 150 Fiorini, 1 , 1 , 1 , 1 | 7 | 1 |
| Palazzo Vescovile | Salone | | 50 Fiorini, 1 , 1 , 1 , 1 | 5 | 1 |
| San Lorenzo | Sagrestia nuova | | 150 Fiorini, 3 , 1 , 1 | 8 | 1 |
| San Lorenzo | Sagrestia vecchia | | 100 Fiorini, 1 , 1 , 1 , 1 | 7 | 1 |
| Santa Maria Novella | Cappella | | 100 Fiorini, 1 , 1 , 1 , 1 | 6 1 | 1 |
| Santa Maria Novella | Chiostro | | 50 Fiorini, 3 , 1 , 1 | 7 1 | 1 |
[Solo] Ghosts complete Artworks at once, without paying — see Solitaire.