Teach the Game
A script to teach Carnegie at the table — how you win, the board and your Company, a round, the end, every way to score and what each resource is for.
How you win
“America, late 1800s. Each of us runs a company in the spirit of Andrew Carnegie: we hire and train employees, build Departments, put up projects across the four regions, develop transport — and give money away to good causes. Twenty rounds, about two hours. The most victory points wins.”
You need points from many small sources, and most come at the end:
- Donations — up to 12 VP each, scored at the end on what your company achieved.
- Your map — projects in cities (0–3 VP each) and a network linking the major cities (up to 36 VP).
- Your Company — every Department you build (2–3 VP), every standing employee (1 VP) and the VP revealed on your project tabs.
The loop: one player picks one of four actions, everyone does it with their own Departments. Employees you send on Missions come home later, when a Timeline event names their region, and bring income with them.
The boards
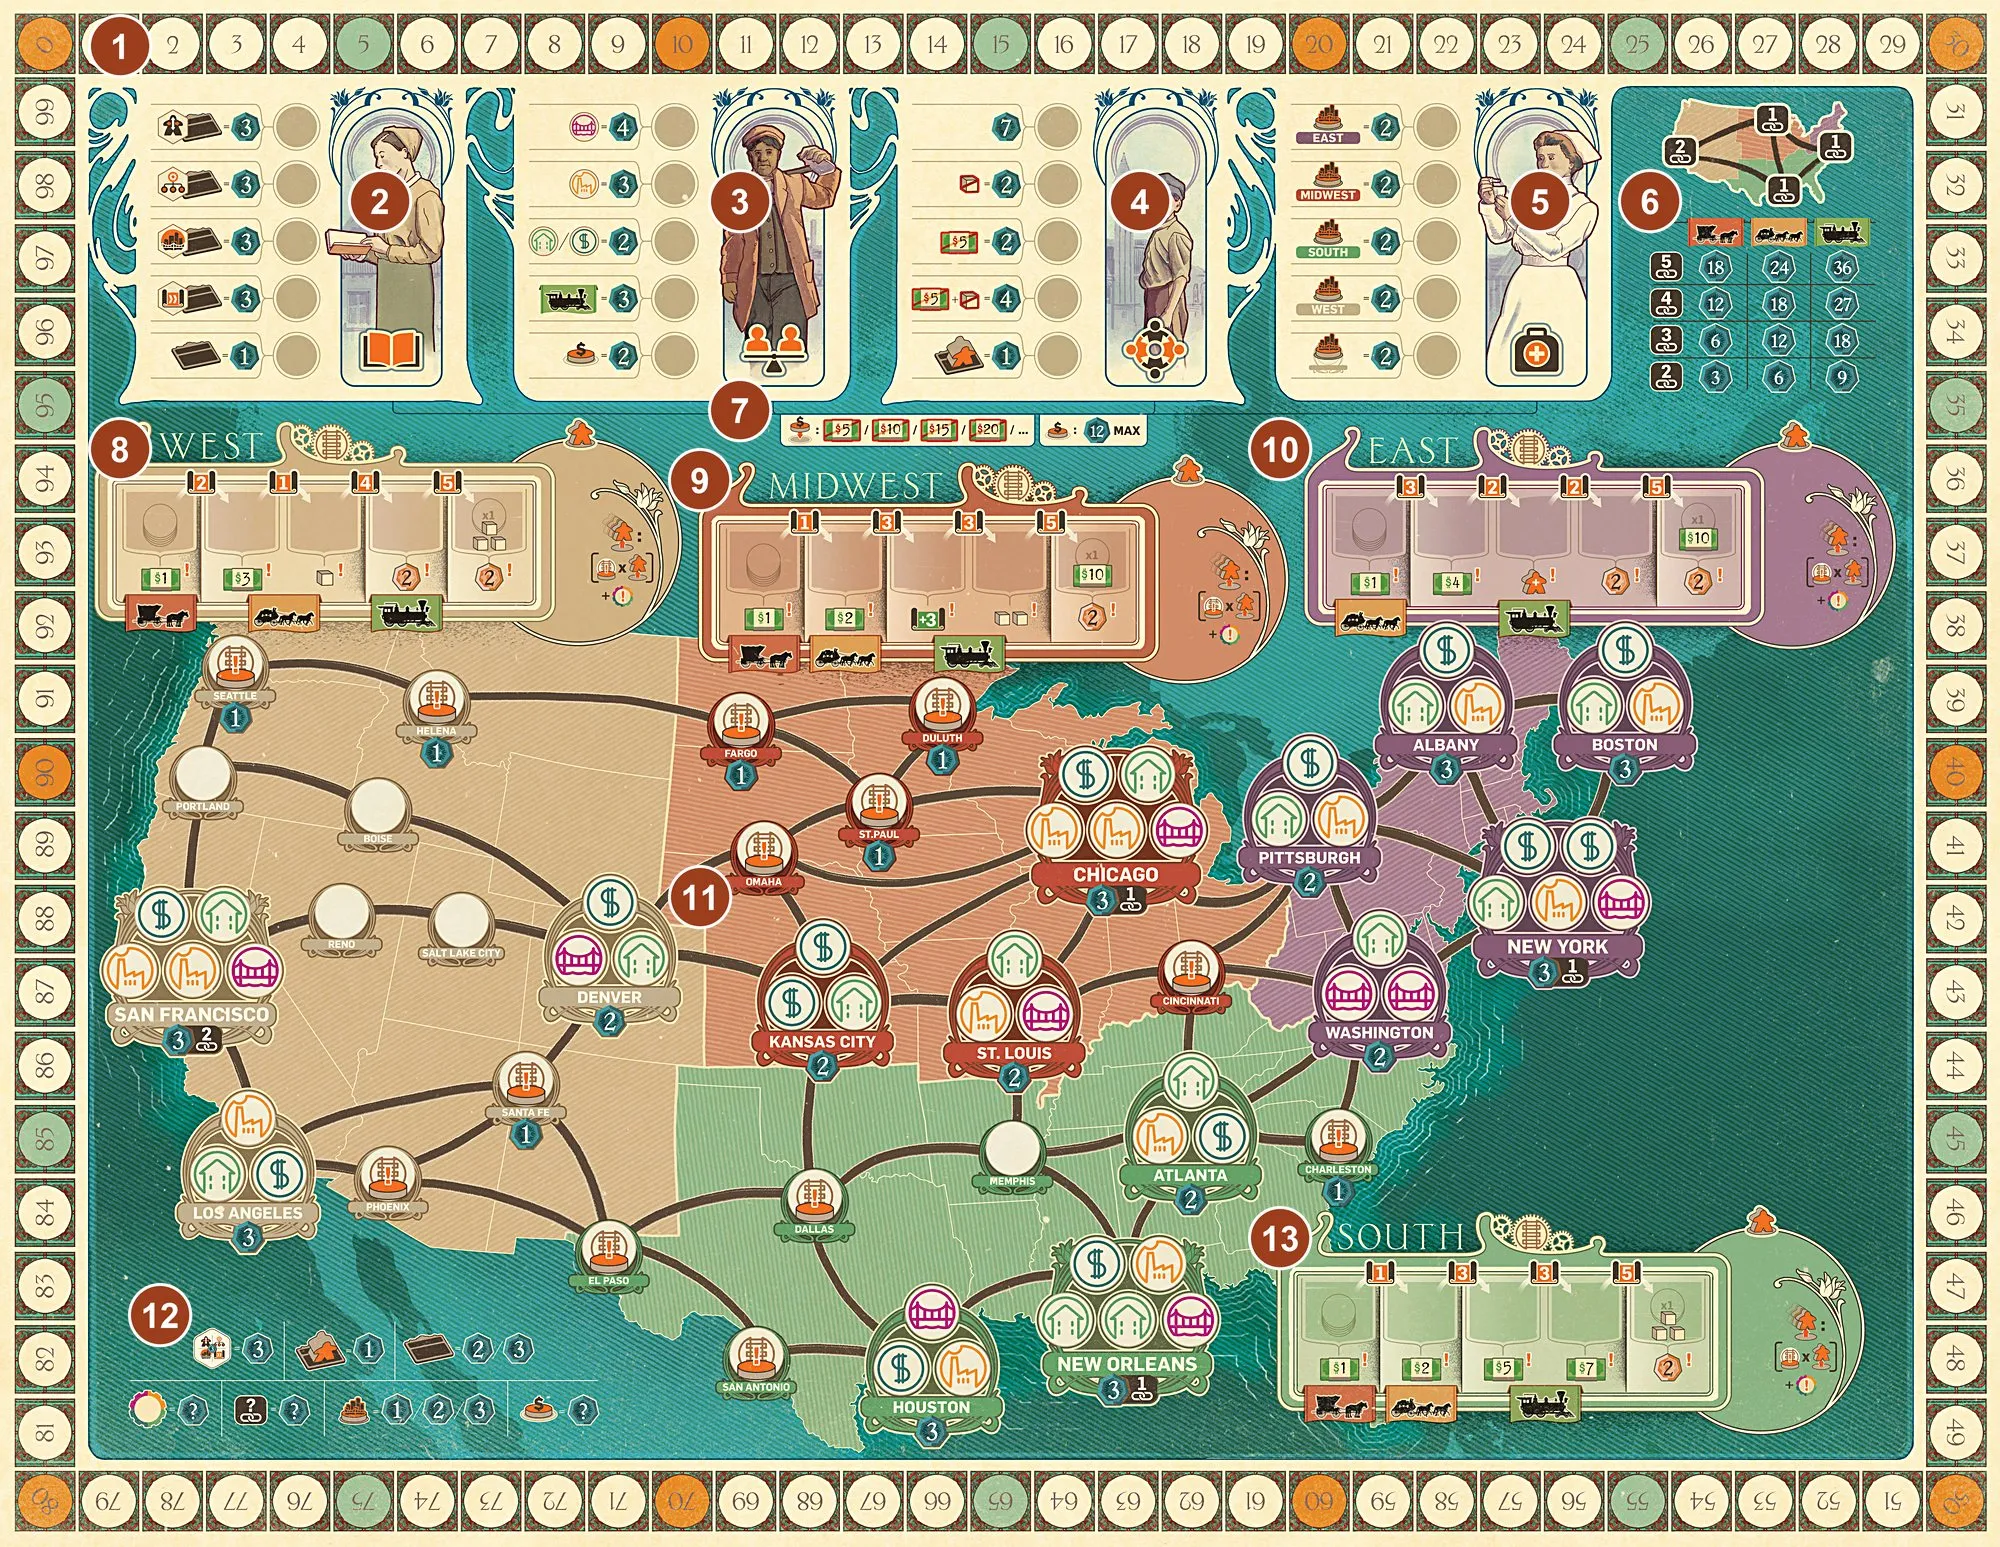
- Score track — immediate VP during the game; final scoring at the end.
- Education donations.
- Human Rights donations.
- Welfare donations.
- Health donations.
- Connection table — major-city links × your slowest transport level.
- Donation costs — $5, $10, $15… and the 12 VP limit per donation.
- West Mission area and transportation track.
- Midwest Mission area and transportation track.
- East Mission area and transportation track.
- The map — cities with project spaces; small cities take any project.
- Scoring reminder — what scores at the end.
- South Mission area and transportation track.
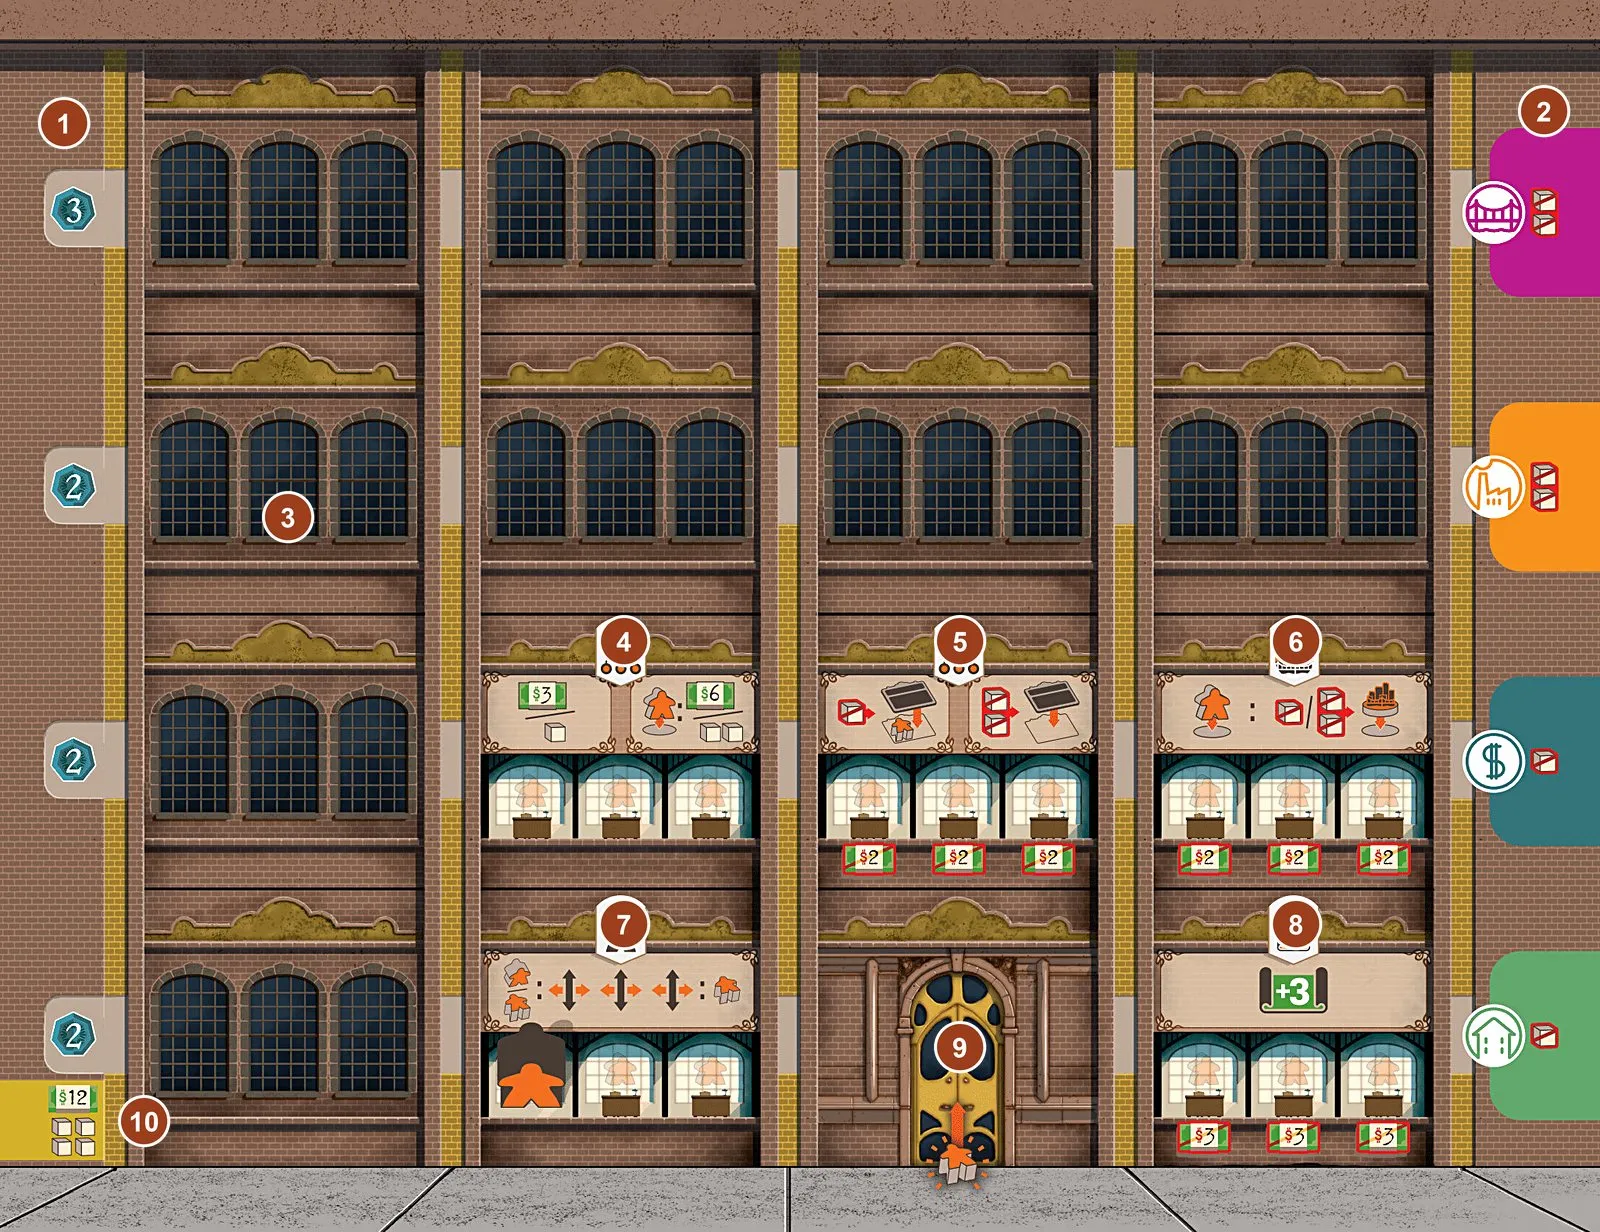
- VP per row — 3 VP for a Department built in the top row, 2 VP elsewhere.
- Project tabs — Public Infrastructure, Industry, Commerce, Housing, with their goods-cube cost to build.
- Empty building space — where new Departments go.
- Commerce and Finance — money or goods.
- Strategic Planning — build Departments.
- Construction — build projects on the map.
- Human Resources — move employees (one permanent employee).
- Research and Development — study points.
- Lobby — where employees arrive and return.
- Starting resources — $12 and 4 goods cubes.
The Timeline beside the board has four rows — Human Resources, Management, Construction, R&D — each with its action marker; every space shows the event it triggers.
A round
Twenty rounds; the first player changes every round. Details.
- Select a Timeline — the first player puts the Timeline marker just right of one action marker: that is this round’s action for everyone.
- Event — the space shows a region (everyone may bring employees home from that Mission area and collect income) or a donation symbol (everyone may donate). The last spaces do both.
- Use Departments — in turn order, each player uses their Departments of the chosen type, once per standing employee.
- End of round — everyone may pay to stand up (activate) employees; the action marker moves one space right; first-player and Timeline markers pass clockwise.
For a practice round, move one standing employee with Human Resources and lay it down. Show the salary on its new Workstation, then wait until the end-of-round activation step to stand it up. Now point to a Mission area: a worker sent there leaves the Company and needs an Income event for that region to return to the Lobby.
How the game ends
- Trigger: after round 20, when all four action markers have reached the End of their rows.
- Final scoring: add Department, employee, project-tab, connection, city and donation VP to your score-track total. Details.
- Ties: none broken — tied players share the win.
Ways to score
| Source | How and when |
|---|---|
 Immediate VP | During the game, from income spaces and some Departments |
 Departments built | End: 3 VP each in your top row, 2 VP elsewhere (starting Departments don’t count) |
 Standing employees | End: 1 VP each (not those on Missions, not the permanent HR employee) |
| Project tabs | End: every VP space you have revealed — up to 6 Housing, 9 Commerce, 12 Industry, 15 Public Infrastructure |
 Major-city connections | End: connection points × lowest transport level among the linked regions, up to 36 VP |
 Projects in cities | End: 0–3 VP each, printed under the city |
 Donations | End: each donation’s condition, up to 12 VP (more with a tab’s +3 bonus) |
| Action Choice tile (3–4 players) | End: 3 VP if unused |
| [D&D] New Departments and Donations | End: extra conditions (Departments & Donations) |
What each resource is for
| Resource | Why you need it | How you get it | How you use it |
|---|---|---|---|
| Employees | Every Department works once per standing employee | 10 at the start; more from Recruiting, Housing income and the East track | Move them with Human Resources, pay to stand them up, send them on Missions |
 Money | Activation costs, donations | Commerce and Finance, transport and project income, Departments | Stand up employees, donate ($5, $10, $15…), some Departments |
 Goods cubes | Build Departments and projects | Commerce and Finance, income, Departments | 1–2 per Department or project; sell for $1 any time |
 Study points | Grow projects and transport | R&D Departments, some income spaces | Slide project tabs out (new disks, income, VP) and advance on transport tracks |
| Disks | Projects, donations, track positions | 30 per player | Built from your project tabs; donations come from your supply |
| Department tiles | More and better actions | Strategic Planning (1 cube where an employee stands, else 2) | Hold up to 1–3 standing employees each |
Teaching tips
- Start with the Company board: standing vs lying employees, and that a Department works once per standing employee.
- Explain Missions before the Timeline: an employee sent out is gone until an event names its region — that is why the Timeline choice matters to everyone.
- The first event of the game does nothing if it is income: nobody has employees on Missions yet.
- Show one donation and its 12 VP limit; donations are where most players under-invest.