Race Cards
Every part of a Race card, and all 84 cards with speed, movement, Wear and special text.
Parts of a Race card
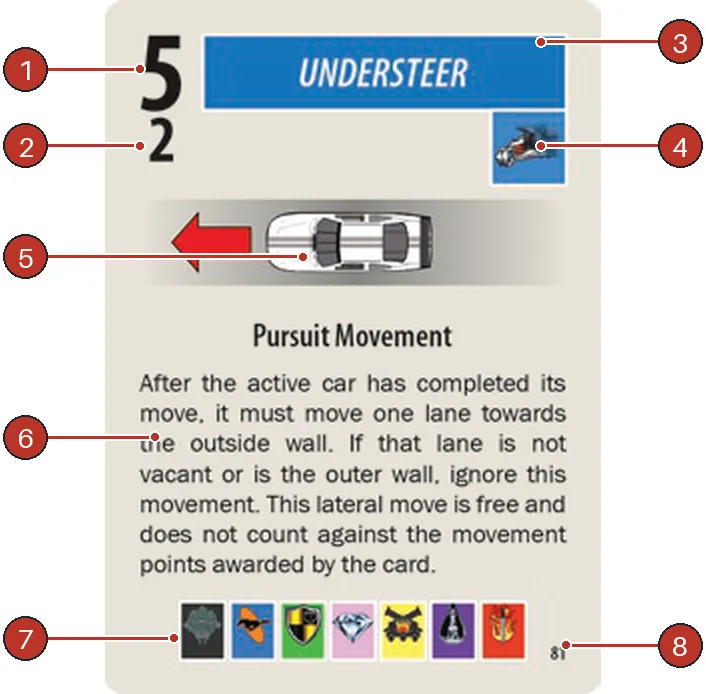
- On-track speed — the big number: Movement Points (MPs) on the track.
- Pit exit speed — the small number: MPs when leaving the pits.
- Card name — its colour is the Wear the card causes.
- Wear indicator — the Wear marker the car takes.
- Type of movement — Solo, Draft, Pursuit or Lead.
- Spotter instructions — special rules for this card.
- Team Bar — tie-breaks, random picks and the starting grid.
- Card number — only to identify a lost card.
Speed and pit exit speed
The active car gets the on-track speed in MPs, minus any speed penalty. A car leaving the pits uses the small pit exit speed instead, with no penalty, no Wear and Solo movement whatever the card says (Exiting the pits).
Card name and Wear
A coloured name and Wear indicator mean the active car takes that Wear marker after it moves. A white name means no Wear. Only the active car takes Wear — cars it drags along don’t.
Spotter instructions
Special text. When it contradicts the rulebook, the card wins.
The Team Bar
Seven team symbols in a row. Read left to right, skip teams not in the race or with no cars left. Setting the grid, the second pass reads it right to left (Setup).
The card list
84 Race cards. Photos of the cards: Thunder Alley images on BoardGameGeek. Cards with no special text in the table behave exactly as their movement type.
| Card | Description |
|---|---|
| 1–3 — Rubbin’ is Racin’ | Speed 4 / pit 3; Draft; no Wear. Lateral moves cost 0 MPs, and you may repeat them as long as each move is legal. FAQ. |
| 4–6 — Teamwork | Speed 4 / pit 2; Draft; no Wear. After the active car, another of yours may move 3 MPs with Draft; this second move cannot exit the pits. FAQ. |
| 7–12 — Riding the Draft | Speed 4 / pit 2; Draft; no Wear. No lateral moves, though you still choose a lane at corners. |
| 13–15 — Clean Air | Speed 4 / pit 2; Solo; no Wear. If the active car ends alone in its sector, it may jump to link behind a car farther ahead, even with 0 MPs; it cannot cross the finish line. FAQ, FAQ. |
| 16–18 — Working the Pack | Speed 4 / pit 2; Solo; no Wear. Each swap costs 1 MP; you may instead spend 3 MPs to push the car ahead, and repeat either option while MPs remain. FAQ. |
| 19–23 — Chasing the Race | Speed 5 / pit 2; Draft; take blue Suspension Wear after moving. No lateral moves, though you still choose a lane at corners. |
| 24–27 — Oversteer | Speed 5 / pit 2; Pursuit; take blue Suspension Wear after moving. Shift one lane inward only if the space is empty and not the Apron; if it would be the Apron, stay put. FAQ. |
| 28–32 — Making a Move | Speed 6 / pit 2; Lead; take green Fuel Wear after moving. |
| 33–40 — Watch the Gauge | Speed 6 / pit 2; Draft; take green Fuel Wear after moving. |
| 41–45 — Staying with the Pack | Speed 6 / pit 2; Pursuit; take green Fuel Wear after moving. |
| 46–49 — Dirty Air | Speed 6 / pit 2; Solo; take green Fuel Wear after moving. |
| 50–52 — Set the Pace | Speed 8 / pit 4; Lead; take permanent lavender Transmission Wear after moving. |
| 53–55 — Top Gear | Speed 8 / pit 4; Solo; take permanent lavender Transmission Wear after moving. |
| 56–58 — Follow the Leader | Speed 8 / pit 4; Lead; take permanent orange Engine Wear after moving. |
| 59–61 — Floor It | Speed 8 / pit 4; Solo; take permanent orange Engine Wear after moving. |
| 62–64 — Fast Pace | Speed 8 / pit 4; Pursuit; take black Tire Wear after moving. |
| 65–68 — Charge | Speed 7 / pit 3; Solo; take black Tire Wear after moving. |
| 69–72 — Slingshot | Speed 7 / pit 3; Lead; take black Tire Wear after moving. Once per turn, the active car may move diagonally into an empty space for the normal 1 MP; linked cars copy the move. It may pass between diagonally adjacent cars. FAQ, FAQ, FAQ. |
| 73–76 — Out in Front | Speed 7 / pit 3; Lead; take black Tire Wear after moving. |
| 77–78 — Outside Line | Speed 7 / pit 3; Draft; take black Tire Wear after moving. Move straight or outward, and use the outside lane at corners. |
| 79–80 — Inside Line | Speed 7 / pit 3; Draft; take black Tire Wear after moving. Move straight or inward, and use the inside lane at corners. |
| 81–84 — Understeer | Speed 5 / pit 2; Pursuit; take blue Suspension Wear after moving. Shift outward after the move only if that space is empty and not the wall. |
The rulebook’s list prints Understeer as 80–84; the card pictured in the rulebook is number 81.
Clean Air
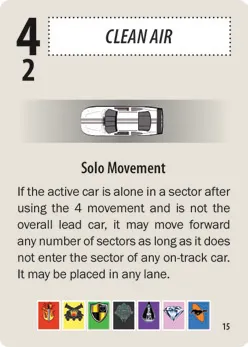
At the end of its move, if no other car is in its sector, lift the active car and place it linked behind any car in the next sector ahead in running order — any number of sectors, any lane. Cars on the Apron are ignored. The race leader can’t use this jump.
Working the Pack
Swaps aren’t displacement: it costs 1 MP per swap. See the worked example.