Emperor and Final Scoring
The Emperor track, the three Emperor scorings with their bonuses and penalties, all 12 Emperor tiles, the final scoring, the tie-breaker and the two variants.
The Emperor track
The track has 13 spaces after the start space 0. You advance with action 4, guests, yellow groups
and Staff ( ). You can never pass space 13: each step beyond it is 1 point at once.
Each space shows the points it pays at an Emperor scoring:
| Space | 0 | 1 | 2 | 3 | 4 | 5 | 6 | 7 | 8 | 9 | 10 | 11 | 12 | 13 |
|---|---|---|---|---|---|---|---|---|---|---|---|---|---|---|
| Points | 0 | 1 | 2 | 3 | 3 | 4 | 4 | 5 | 5 | 6 | 6 | 7 | 8 | 9 |
Spaces 3 to 13 are yellow (bonus), 1 and 2 are neutral, 0 is black (penalty).
Emperor scoring
At the end of rounds 3, 5 and 7, every player in turn:
- Scores the points under their Emperor marker.
- Moves the marker back: 3 spaces after round 3, 5 after round 5, 7 after round 7.
- Checks the space reached, against that round’s Emperor tile:
| Space after moving back | Result |
|---|---|
| 3 or more (yellow) | the tile’s bonus (top half) |
| 1 or 2 | nothing |
| 0 | the tile’s penalty (bottom half) |
The marker stays where it lands; it does not reset.
If a penalty gives two options, take the first one if you can; only when you cannot take it fully do you lose the points instead. If it matters, players resolve tiles in turn order. FAQ FAQ FAQ
Emperor tiles
One A tile (after round 3), one B (after round 5) and one C (after round 7) are in play. FAQ FAQ FAQ FAQ FAQ FAQ
| Picture | Emperor tile |
|---|---|
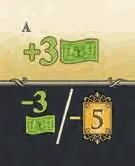 | A · 3  ; penalty: lose 3 krones, or 5 points |
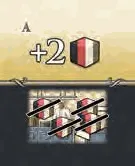 | A · any 2 dishes or drinks  ; penalty: return everything in your kitchen |
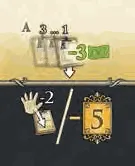 | A · draw 3 Staff, play one for 3 krones less, the rest under the deck; penalty: 2 Staff from your hand under the deck, or 5 points |
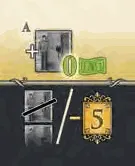 | A · prepare a room for free; penalty: 5 points, or remove an unoccupied room from your highest possible row |
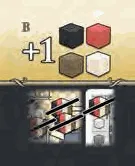 | B · 1 strudel, 1 cake, 1 wine and 1 coffee; penalty: return everything on your guests and in your kitchen |
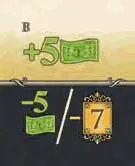 | B · 5 ; penalty: lose 5 krones, or 7 points |
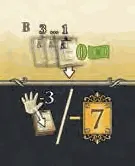 | B · draw 3 Staff, play one for free, the rest under the deck; penalty: 3 Staff from your hand under the deck, or 7 points |
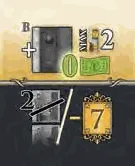 | B · place a Room tile of any colour in row 1 or 2, already occupied (next to another room); penalty: 7 points, or remove 2 unoccupied rooms from your highest possible rows |
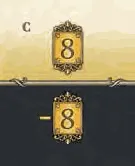 | C · 8 points; penalty: lose 8 points |
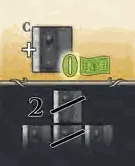 | C · place an occupied room of any colour anywhere next to a room; penalty: remove 2 occupied rooms: the highest one and the next one below it |
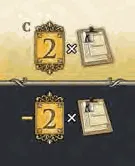 | C · 2 points per Staff card you hired; penalty: lose 2 points per Staff card you hired |
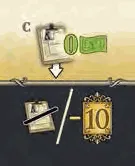 | C · play a Staff card from your hand for free; penalty: discard a hired game-end Staff card, or 10 points |
Final scoring
After the Emperor scoring of round 7:
| Source | Points |
|---|---|
 Hired Staff with a game-end effect | as printed |
| Occupied rooms | 1 each in row 1, 2 in row 2, 3 in row 3, 4 in row 4 |
| Krones left | 1 each |
| Dishes and drinks left in the kitchen | 1 each (not those on guests) |
| Guests still in the café | −5 each |
Add your 75/150 marker to your position on the score track. Most points wins.
Tie-breaker
The tied player with more dishes, drinks and krones left wins.
Introductory variant
For a first game, deal equal starting hands: sort out the recommended Staff sets; the start player takes set A, the next player set B, and so on. Shuffle the rest into the deck.
Variant for experienced players
Draft your Staff: everyone takes 6 cards, keeps 1 and passes the rest left; repeat until each player holds 6.