Teach the Game
A script to read aloud: how you win, the boards, a round, the end, every way to score and what each resource is for.
How you win
1835: the HMS Beagle reaches the Galápagos. Over five rounds you send your crew out to explore the islands, sail the coast, write to the scientific world and study at the Academy. You collect specimens, deliver them to the Museum and build up the Theory of Evolution. The most victory points
at the end wins.
What you need, and how you get it:
| You need | Why | How |
|---|---|---|
| Trained workers | Every action space asks for     Wax Seals on the worker you send | Buy seals at the  Academy; 4 seals = silver distinction, 6 = golden |
| Specimens | Delivered to the Museum they pay Coins and push your Evolution marker | Stop your  Explorer or  Ship on a specimen and research it |
| Theory of Evolution books | The biggest end score: books reached × the Museum multiplier |  advancements from deliveries, letters and tiles |
| Objectives | Points and permanent perks on your personal board |  take tiles, meet their requirements, slot them face down |
The loop: train a worker → send it to explore, sail or write → research and deliver specimens for money and books → spend the money on more seals and unlocks.
The boards
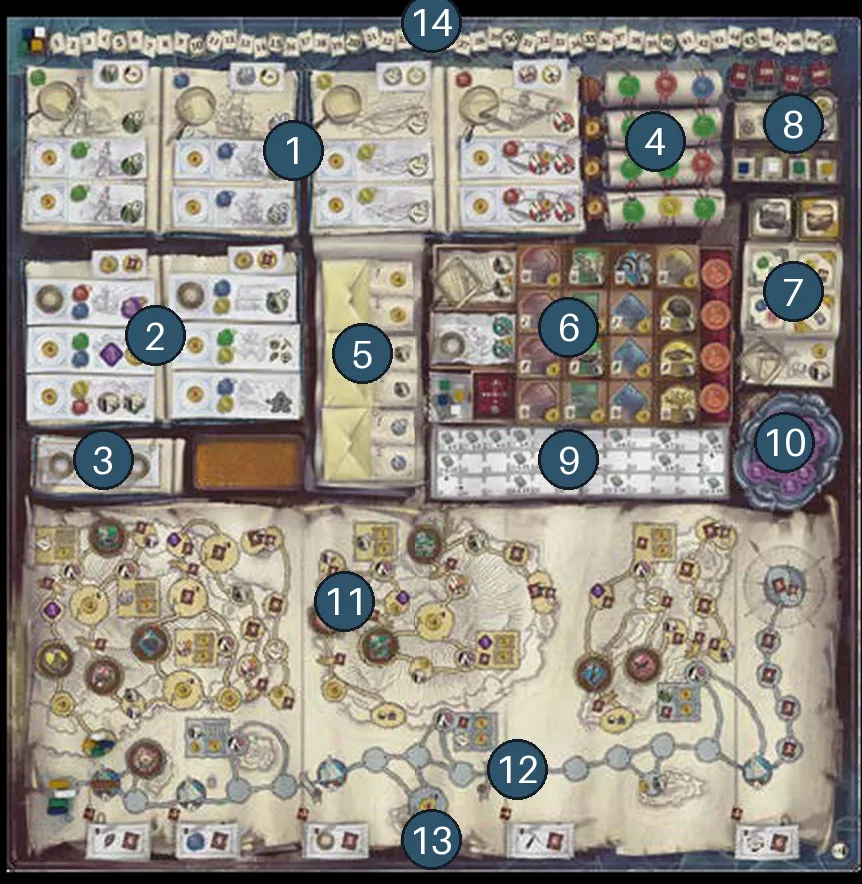
- Main Diaries — Exploration, Navigation, Correspondence and Academy spaces, stronger lower down
- Special Action Diary — six random Special Action tiles, unlocked with Lens tokens
- Small Diary — two spaces to unlock a locked location with your Lens
- Academy Scrolls — the Wax Seal market; lower Scrolls cost more
- Envelopes — three Correspondence tiles, scored each round by Stamp majority
- Museum display — where delivered specimens go, row by row
- Objective display — silver and golden Objective stacks with two of each on offer
- Turn Order track — who plays first next round
- Theory of Evolution track — your Evolution marker and its Book multipliers
- Silver plate — the Special Wax Seals (purple)
- Island tracks — your Explorers walk here, past specimens and campsites
- Ocean track — your Ship and the HMS Beagle
- Beagle Goal tiles — one is scored at the end of each round
- Victory point track — round the edge
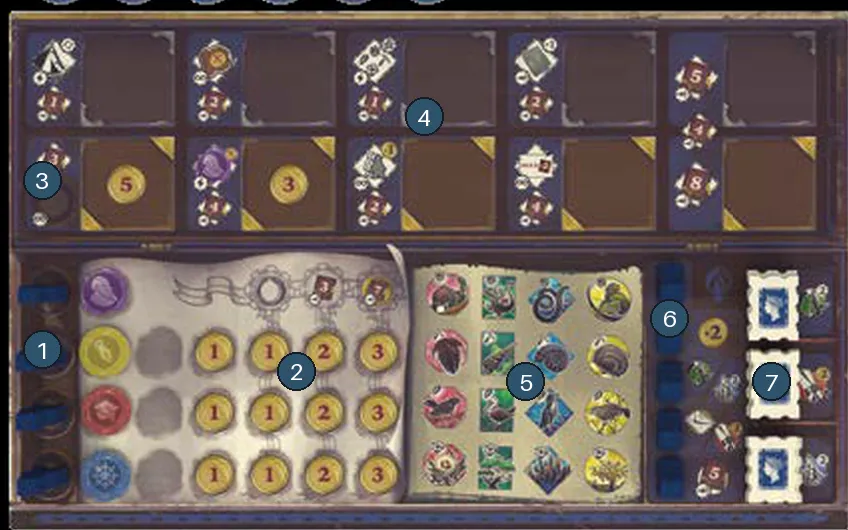
- Workers — four at the start, each in its own row
- Wax Seal rows — new seals fill from the left; the numbers are their Coin cost
- Fifth worker space — opened by the leftmost golden Objective
- Objective rows — silver on top, golden below; each space shows its reward
- Specimens — 16 specimens: four types (
 ) in four colours
- Tents — taking a Tent frees the action beside it
- Stamps — emptying a stack frees the action beside it
A round
Five rounds, four phases each. (Full round)
- Action phase. In turn order, place one worker and do the actions of that space; repeat until everyone has placed all workers. A worker can only go where it has the seals shown;
 Temporary Knowledge stands in for a missing seal. A Diary section already holding a worker costs 3 Coins at 2 players, 2 Coins at 3–4.
- Turn Order phase. Workers on the Turn Order space set next round’s order.
- Reward phase. Each Envelope pays its 1st and 2nd Stamp majorities; then everyone scores the Beagle Goal tile under the Beagle, minus lagging penalties if their Ship is behind it.
- Cleanup. The Beagle sails on, workers come home, new Objectives come out and the top Academy Scroll is cleared and refilled.
Before the first placement, rehearse a qualification check: a space asking for two yellow seals accepts a worker with one yellow seal if you spend one Temporary Knowledge token. The seal stays on the worker; the token is spent. Then check the Diary section for its placement penalty. (Worker placement)
How the game ends
After the fifth Reward phase, skip Cleanup and do final scoring: the Theory of Evolution track, your personal board, leftover Coins and Temporary Knowledge. Ties: furthest on the Theory of Evolution track, then most Coins; then a shared win. (Final scoring)
Ways to score
| Source | How | When |
|---|---|---|
| Theory of Evolution | Books reached × (2 + completed Museum rows) | End |
 Objective spaces | The victory points printed on the spaces where you slotted achieved Objectives; 4 more if both rightmost spaces are filled | End |
| Trained workers | 3 for a worker with 5 seals, 10 for one with 6 | End |
 All 5 Tents out | 5 | End |
| Coins and | 1 per 5 Coins, 1 per Temporary Knowledge token | End |
| Beagle Goal tiles | Points per seal, specimen, Lens, Tent, Objective or empty Stamp stack — minus  lagging penalties | Each round |
| Island and Ocean tracks |  Golden ribbons (first to cross), +3 for first to a track’s end, VP spaces | When reached |
| Letters, Special Actions, Crew cards | where shown | When gained |
| [Fireland] Time and Adventures | Lose 0 to 18 VP for Time spent; Adventure tokens score −10 to +15 by count (Fireland) | End |
| [Oceania] Hazards, Villages, Consequences | Lose 5 per Hazard past the fifth step and points from Consequence tiles; golden Village points and 2 per Consequence tile kept (Oceania) | Each round and End |
What each resource is for
| Resource | Why you need it | How you get it | How you use it |
|---|---|---|---|
 Coins | Seals, unlocks, placement penalties and second deliveries all cost money — it is tight | 4 at the start; Museum deliveries;  Turn Order and Objective spaces; letters; your Lenses when others use them | Pay costs in red; 1 VP per 5 at the end |
| Wax Seals | Let a worker use spaces; 4 and 6 give distinctions; 5 and 6 score | Academy; Crew cards at setup | Never removed; count for Crew cards, Objectives and Beagle goals |
 Special Wax Seal | Counts as any colour for placement and Crew cards | Special actions, Crew card 11, an Objective space | Not for Objectives or Beagle goals |
| Temporary Knowledge | One-off missing seal when placing a worker | 1 at the start; letters, tiles, Crew cards | Spend while placing; never for Objectives or Crew cards; 1 VP each at the end |
 Lens tokens | Unlock locked spaces for everyone, and you do the action at once | Unlock Lens Location | Opponents who use your Lens pay you 1 Coin (from the supply) |
| Explorers and Ship | Reach specimens, campsites and rewards | Exploration and Navigation; crossing a  silver banner adds an Explorer | Stop on a space to do its action |
| Research tokens | Mark specimens you have studied | Explore or sail onto a specimen; Museum research | Needed to deliver; count for Objectives and Beagle goals |
| Tents and Stamps | Each Tent placed or Stamp stack emptied unlocks the action next to it | Campsites; Correspondence | 5 Tents placed = 5 VP; Stamps win Envelope majorities |
| Objectives and Crew cards | Points, perks and one-shot actions | Objective display; 3 Crew cards at setup | Achieve when you meet the requirements, on your turn or in the Reward phase |
Teaching tips
- Start with the personal board: a worker row, its seals, and the space it can reach. Everything else follows from “who can go where”.
- Say early that money is tight and that the first deliveries to the Museum are the main income.
- Rehearse Unlock Lens Location: after paying and placing the Lens, you may immediately perform the unlocked actions without placing a worker or meeting seal requirements. Point out this optional bonus before moving on.
- Point at the Beagle and the lagging penalties before round 1: Ships that never sail lose points every round.
- Use the first-game setup: fixed Special Action, Correspondence and Beagle tiles, and fixed Crew cards. (Setup)