Teach the Game
A script to teach The White Castle at the table — how you win, the board and your Domain, a turn and a round, the end, every way to score and what each resource is for.
How you win
“Himeji, 1761. We lead small clans trying to win favour in the White Heron’s castle. In just three rounds of three turns each we take dice from three bridges and use them to send our family into the castle as Courtiers, into the training yards as Warriors and into the gardens as Gardeners. About an hour. Most Clan Points wins.”
You score mostly at the end, for the clan members you placed:
- Courtiers — 1 to 10 points, the higher they climb in the Castle.
- Warriors — their Yard’s value times your Courtiers inside the Castle.
- Gardeners — the points printed on their Garden card.
- Plus the Passage of Time track, leftover coins, Seals and Resources, and points gained during play.
The loop: take a die from the end of a bridge, place it on an action space — pay or earn coins for its value — then take the action. Only nine dice a game: every one counts.
The boards
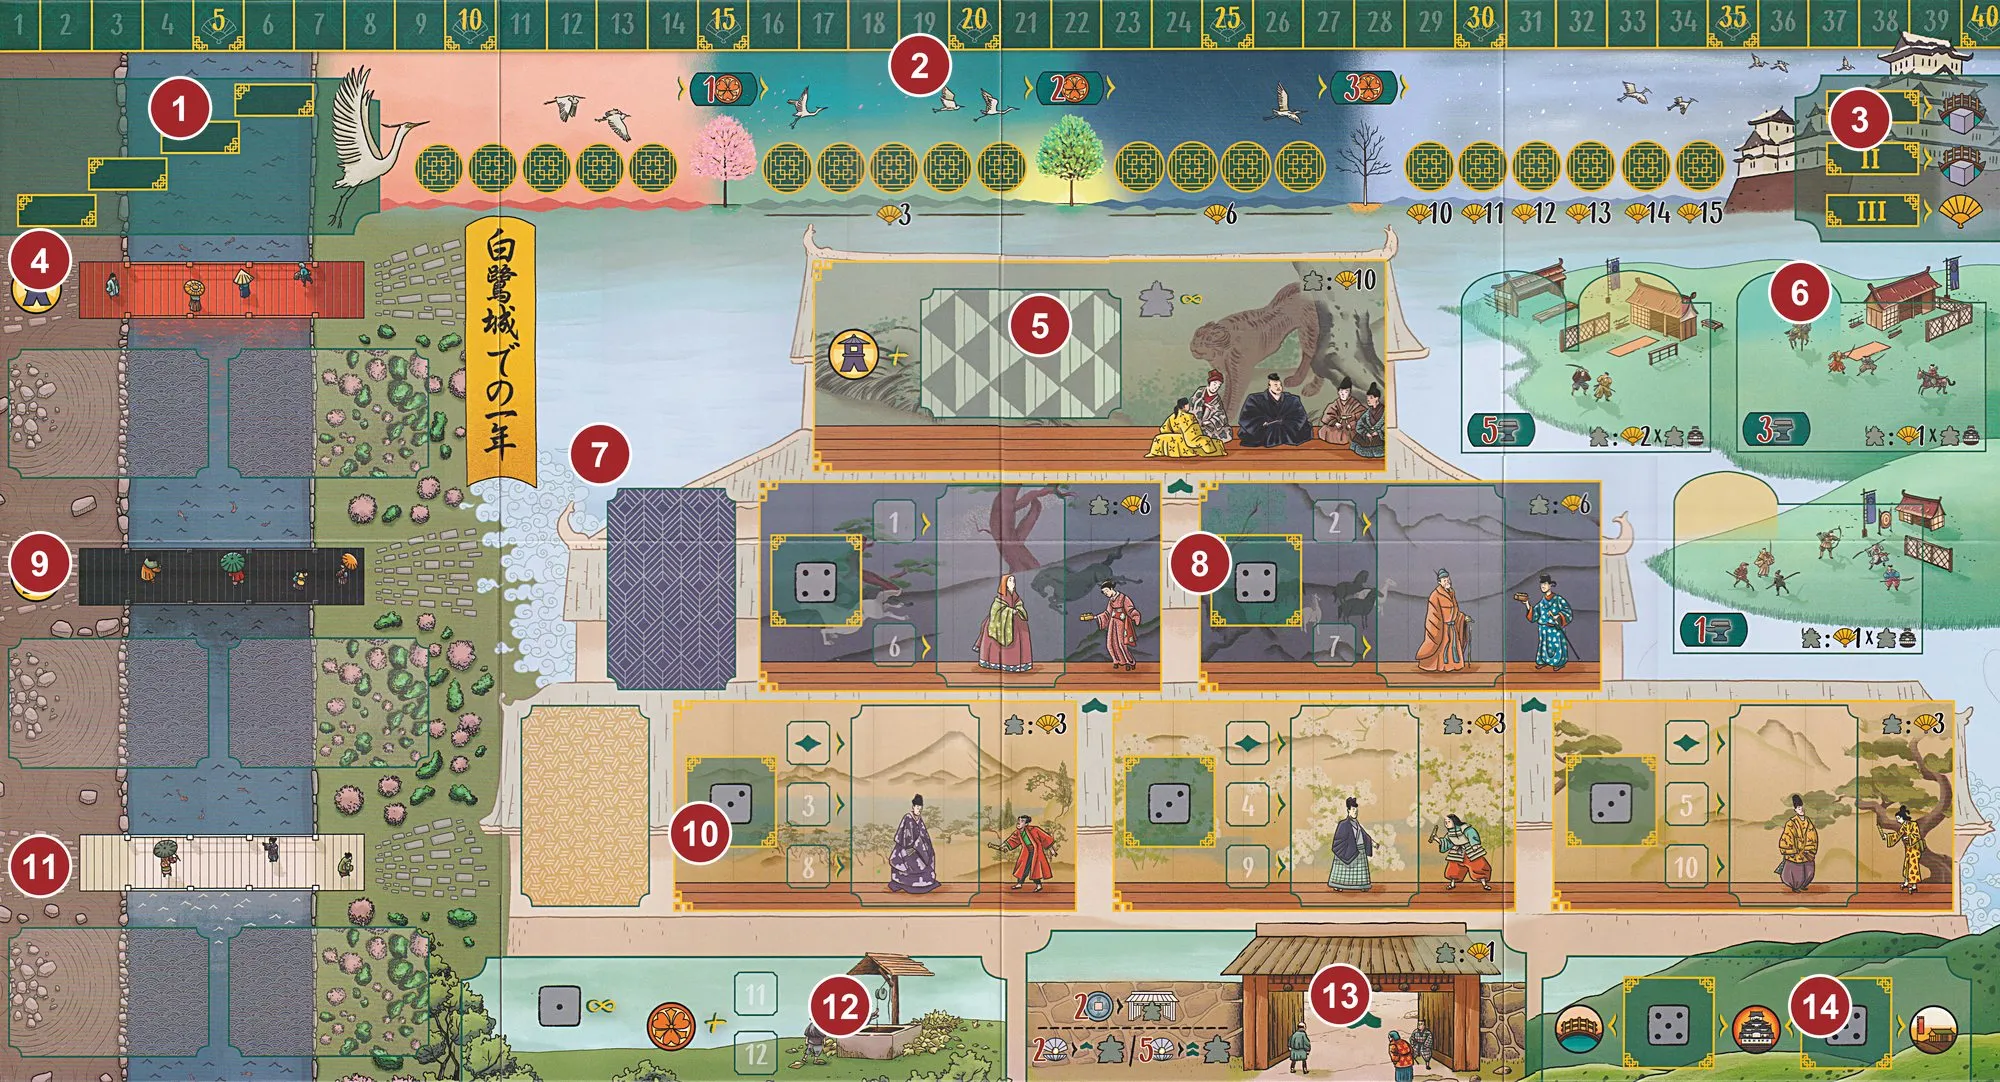
- Turn Order track — the Heron tokens; who plays first this round.
- Passage of Time track — Influence, seasons and end-game points.
- Round track — rounds I–III.
- Coral Bridge — coral dice, lowest on the left by the lantern.
- Daimyo’s floor — the top floor; its card holds three favours.
- Training Yards — where Warriors go: 5, 3 or 1 Iron.
- Castle card decks — Steward and Diplomat cards to refill rooms.
- Diplomats’ floor — two rooms, two Die tiles each.
- Black Bridge — and the Gardens beside each Bridge.
- Stewards’ floor — three rooms, three Die tiles each.
- White Bridge.
- The Well — always worth 1; a Seal and two tile rewards.
- Castle Gate — where Courtiers enter.
- Outside the Walls — two spaces with a choice of two main actions.
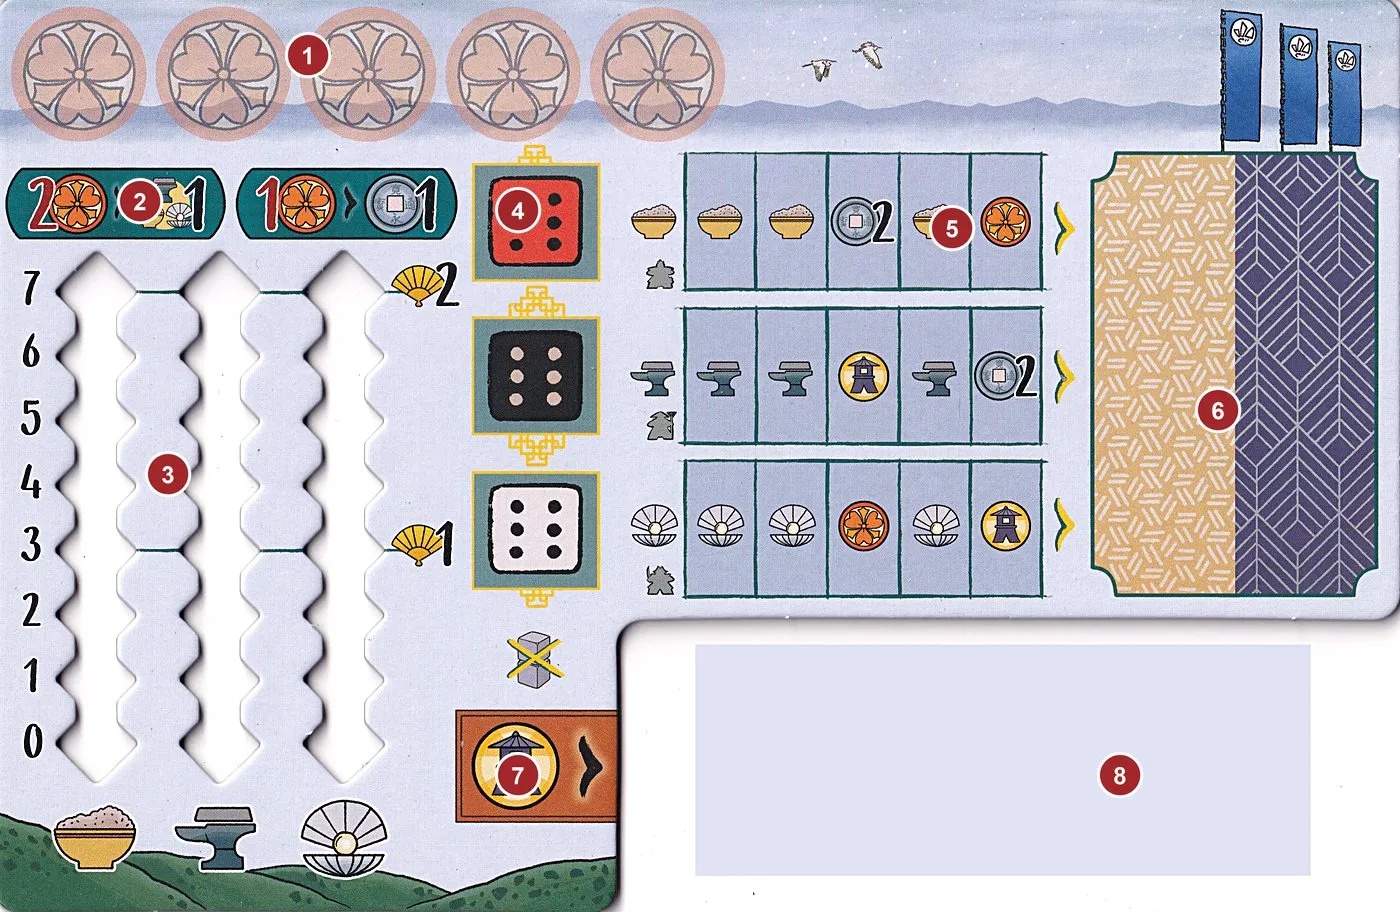
- Daimyo Seals — up to 5.
- Seal exchanges — 2 Seals for a Resource, 1 Seal for a coin.
- Resource tracks — Food, Iron, Mother-of-Pearl, 0–7.
- Your die spaces — coral, black, white.
- Clan member lines — rewards revealed as members leave.
- Action card space — the card at the end of the lines.
- Lantern — your Lantern Reward symbol.
- Lantern Area — cards slide in here below the board.
A round
Three rounds; each player takes 3 turns a round. Details.
- Take a die from either end of any Bridge. The left end also gives your Lantern Reward.
- Place it on an empty action space (or on top of a die, with 3–4 players). Higher than the value below: gain the difference in coins. Lower: pay it.
- Take the action(s) of that space, in any order.
When only 3 dice remain on all Bridges, the round ends: new turn order from the Passage of Time track, then (rounds 1–2) Gardeners under Bridges that still hold dice act again, and the dice are rerolled.
How the game ends
- Trigger: after round 3 — set the turn order, skip the Gardens and score.
- Final scoring: coins and Seals, leftover Resources, the Passage of Time, Courtiers, Warriors and Gardeners. Details.
- Ties: the player higher in turn order wins.
Ways to score
| Source | How and when |
|---|---|
 Clan Points in play | Any time an icon gives them (Castle cards, Daimyo card, Yard tiles…) |
 Courtiers | End: 1 at the Gate, 3 on the Stewards’ floor, 6 on the Diplomats’, 10 with the Daimyo |
 Warriors | End: total Yard value of your Warriors × your Courtiers inside the Castle |
 Gardeners | End: the points printed on their Garden card |
 Passage of Time | End: 3 in the 2nd season, 6 in the 3rd, 10–15 in the 4th |
  Coins and Seals | End: 1 point per 5, together |
 Resources | End: 1 for each with 3–6 left, 2 for each with 7 |
| [Matcha] Geishas | End: Pond, path and Tea House rooms (Matcha) |
| [Bōeki] Daimyo Gift | End: your Gift’s goal, if your Influence reached it (Bōeki) |
What each resource is for
| Resource | Why you need it | How you get it | How you use it |
|---|---|---|---|
| Dice | Every turn | Take one from a Bridge end | Place on an action space; its value pays or earns coins |
| Coins | Lower dice, Courtiers at the Gate, Gardens | Higher dice, cards, Well tiles | Pay differences, 2 for the Gate, costs on cards |
 Food | Gardeners | Domain coral line, cards | Each Garden card’s cost |
 Iron | Warriors | Domain black line, cards | 1, 3 or 5 to enter a Training Yard |
 Mother-of-Pearl | Courtiers climbing | Domain white line, cards | 2 to climb one floor, 5 for two |
| Daimyo Seals | Seasons, dark actions | Well, cards | Cross Passage of Time checkpoints, pay 1 for dark Castle actions, trade for Resources or coins |
| Influence | Turn order and end points | Cards, Yards, Lantern | Moves you on the Passage of Time track |
 Lantern | A growing personal bonus | Taking a left-end die, icons | Gives every icon visible in your Lantern Area |
Teaching tips
- Start with dice: only the ends of a Bridge, the left end gives the Lantern, the value is paid or earned against what is printed (or the die below).
- Show how a Courtier climbing swaps your Action card and grows your Lantern Area — that is the engine.
- Explain that Warriors need Courtiers inside the Castle to score.
- Point out the round end: the last 3 dice stay, and they decide which Gardens act.
Rehearse a die placement
Use a three- or four-player example: put a coral five on a main-board space showing three and collect two coins. Later a player stacks a one on that five and pays four coins. Compare against the top die, not the printed three. A stack holds at most two dice.
Now ask what changes with two players: stacking is forbidden. If you chose your die from the left bridge end, collect your Lantern Reward after resolving the coin difference, then perform the space’s actions.