Teach the Game
A table-side script for teaching Speakeasy: how you win, the boards, a turn, the Acts, how the game ends, every way to make money and what each piece is for.
This guide follows the English rulebook v19c (2026), the solo rules v11c and the publisher’s April 2026 FAQ.
How you win
It is 1920 and Prohibition has just begun. You are a mob boss in Lucky Luciano’s Manhattan: open speakeasies, distil and smuggle liquor, sell it, keep the Cops paid off and survive the Mob Wars. Thirteen years later Prohibition ends — and the boss with the most money wins. About 45 minutes per player.
- What you need: money — cash in your pocket plus what is in your safe, plus end-game pay for Protected buildings and Helper cards (Final Scoring).
- How you get it: build a network of Operating buildings, move barrels to them and sell (the barrel chain); control districts for Luciano’s payout (Payout Zone Control); cook your Books on goals (Cooking the Books); rob Rum-runner Ships (Docks).
- The threat: Cops shut down unprotected buildings, and every Act new, stronger Mobsters attack the districts marked in advance.
The boards
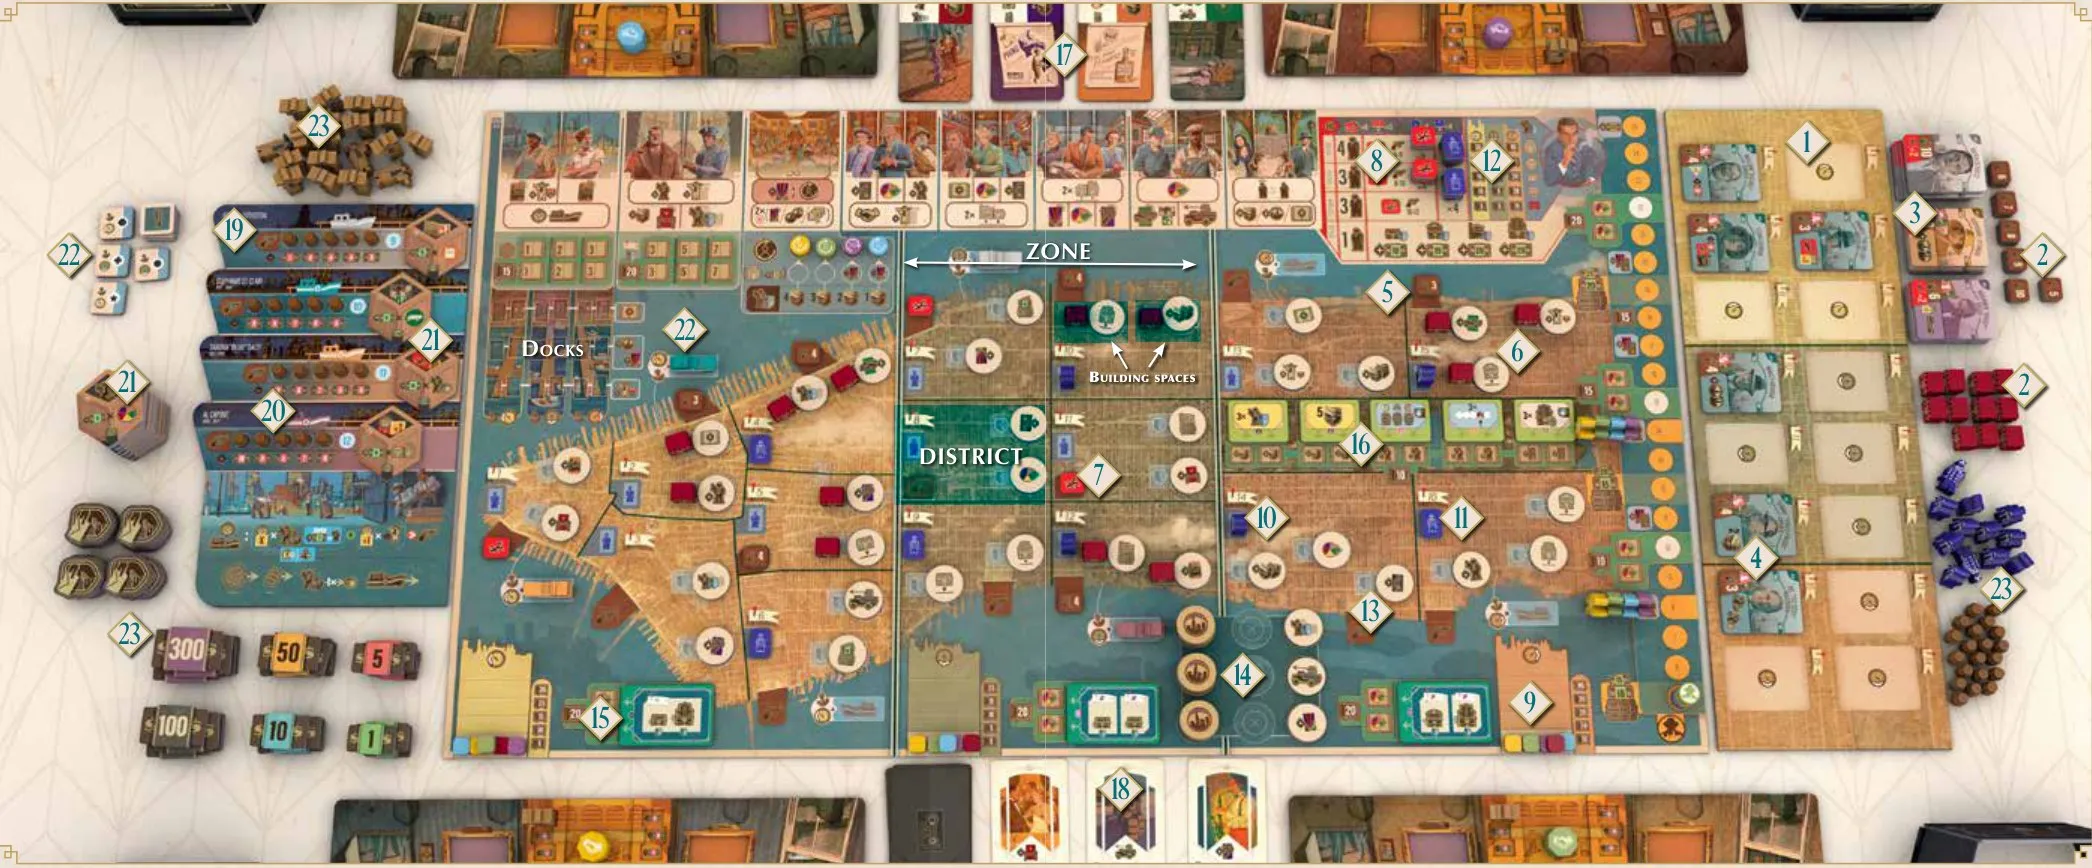
The rulebook’s own setup markers point at each part:
- Mobster board — Mobsters waiting to be hired as Associates
- Mobster supply — Mobster Speakeasies and Strength tiles
- Mobster decks — B, C and D Mobsters for the three Mob Wars
- Mobster tiles — the A Mobsters already in Manhattan
- Mobster Strength tiles — the defence of the Mobster Speakeasies in that district
- Mobster Speakeasies — take them over to build there
- Mob War markers — red tiles: where the next Mobsters arrive
- Time track — future Mob War tiles, so you can plan ahead
- Zone Control tracks — one per Zone, with the Luciano payout beside it
- Cops — districts where unprotected buildings stop working
- Cops to come — face-down Cop tiles arriving at the end of the Act
- Cop stacks — the Cops of later Acts on the Time track
- Building spaces — each with a City tile you collect when you build there
- City tile display — City tiles to take
- Zone goals — one per Zone, worth $20 to cook a Book on
- Central Park goals — five goals, $10 each
- Operations decks — VIP Room, Party, Stills and Fleet
- Helper cards — the display of three
- City Docks board — the four Rum-runner Ships with their prices and defence
- Barrels on the Ships — buy them at a port or steal them
- Crate tiles — the loot for robbing a Ship
- Ports — where the Ships moor
- Supply — barrels, Cops, money, Leverage tokens and Goons
Along the top of the main board are the eight locations with their Persons of Interest; on its right the Infamy track (Infamy) and Turn Order track (Turn order).
Your Operations board holds your four Operations tracks and Strength, your buildings, Goons, Books, City tiles and the slots for one card of each Operations type.
A turn
- Optionally use one Helper card, then put it in your safe.
- Send a Capo to a free Person of Interest at one of the eight locations and do that person’s actions top to bottom (Locations).
- Draw an Operations card.
What the locations are for, in one line each: Contractor Office — open Speakeasies and the Stills; City Planning Office — Nightclubs and Casinos; Garage — trucks deliver barrels; City Hall — protect buildings; Commission — hire an Associate; Docks — rob a Ship; Restaurant — change turn order, play City tiles, cook Books; Park — steal someone’s spot.
The Acts
| Act | Capos to place | After the Act |
|---|---|---|
| 1 | 4 | Luciano Phase: Mob War (B Mobsters), Cops, payout |
| 2 (1925) | 3 | Luciano Phase (C Mobsters) |
| 3 (1928) | 3 | Luciano Phase (D Mobsters) |
| 4 (1931) | 1 | Final Scoring |
See Act structure and Lucky Luciano Phase.
How the game ends
After the single round of Act 4, count your money: cash + safe + Protected buildings ( $10,
 $15,
 $20,
 $20) + one Helper card per different bottle. Most money wins; ties go to most Protected buildings (Final Scoring).
Ways to score
| Source | How and when | Goes to |
|---|---|---|
 Barrel sales | Sell barrels at Operating buildings; price by Infamy, higher at Nightclubs and Casinos | cash |
| Crate tiles | Win a Rum-runner ambush; up to about $25 each | cash |
| Casino skim | $3 per Operating Casino ($5 with two) whenever turn order changes | cash |
| Family Members hired | $1 when someone uses yours in an ambush | cash |
 Cooked Books | $10–$20 per goal at the Restaurant | safe |
| Luciano payout | Zone rank after Acts 1–3 | safe |
| Protected buildings | $10 / $15 / $20 / $20 at the end | score |
| Helper cards | each different bottle at the end | score |
| [Stretch] Public Goals | $10 per goal met at the end (Stretch Goals) | score |
| Losses | Buildings lost in Mob Wars, money laundered 2:1 from the safe, unprotected buildings at the end | — |
What each resource is for
| Resource | Why you need it | How you get it | How you use it |
|---|---|---|---|
 Cash | pay for everything at face value | barrel sales, Crates, Casino skim | spend 1:1 |
| Safe money | the bulk of your score | Cooked Books, Luciano payout, starting $30 | spend at 2:1 (laundering) |
| Capos | your actions | 4 / 3 / 3 / 1 per Act | one per turn at a Person of Interest |
| Operations cards | benefits, Leverage and the four key actions | draw one every turn, locations, tiles | play into a slot; discard to raise levels, at the Restaurant, for Casinos |
 Family Members | protection and ship attacks | locations, Infamy, building benefits, cards | VIP area → protect a building; Docks → ambush |
 Leverage | pays for protection | Operations cards in slots, tokens | 4/3/2/1 per Family Member by turn-order column |
| Barrels | the product | Stills, buying or robbing Ships | Truck them to Operating buildings, then sell |
| Trucks | carry barrels | 1 at start, 2nd at Fleet 3 | move up to range, 2 barrels each |
 Strength, Goons, Associate | win fights | tracks, hiring, Commission | add up for attack (must beat) and defence (must match) |
 Books | turn goals into safe money | locations, building benefits, tiles | cook at the Restaurant |
 Infamy | barrel price and rewards | raising any track | automatic |
| Helper cards | one-off boosts and end-game money | locations, Infamy | use one per turn, then safe |
| City tiles | extra actions | building on a space, display, Park | play two at the Restaurant |
| Crate tiles | cash now, a bonus forever | ambushing Ships | automatic |
Teaching tips
- Teach the Golden Rule first: a building next to a Cop without a Family Member does nothing at all.
- Walk through one barrel’s life: Produce at the Stills (or buy at a port) → Truck → Operating building → Sell.
- Show the red Mob War tiles and Cop tiles on the board: everyone knows where trouble comes next.
- Mention the cash/safe split before the first purchase, and the 2:1 laundering.
- For a first game, use the “rebuild your Stills” variant (Variant).
Rehearse an Operating building
Put a Cop beside a building with no Family Member protecting it. Ask whether it can receive or sell a barrel. It cannot: the building is non-Operating. Now protect it with a Family Member and check again. It is Operating even though the Cop remains.
Before choosing an action that needs a building, point to the Cop and protection in that district. Owning the building alone is not enough.