Teach the Game
A script to teach Nippon: Zaibatsu at the table — how you win, the boards, a turn, the end, every way to score and what each resource is for.
How you win
“It’s the Meiji era and Japan is industrialising fast. Each of us runs a zaibatsu — a family of companies. We build factories, fit them with machines, sell goods across Japan, send ships abroad for experts and lay railways. Three Periods, one to two hours. The most victory points wins.”
You score points in two ways:
- Influence — sell
 Goods in the Local Markets to place Influence tokens. At the end
of each Period the Regions pay out to whoever has the most Influence there, and the payouts grow:
the last Period is worth the most.
- Your Zaibatsu — Favor tokens placed on Personal Objectives (Ships, Machines, Trains, tracks, Factories, Contracts) pay at the end, more the further you have got.
The loop: take Workers to act (build, produce, sell), then consolidate to get paid — but paying your Workers costs Money per colour, so the colours you collect matter.
The boards
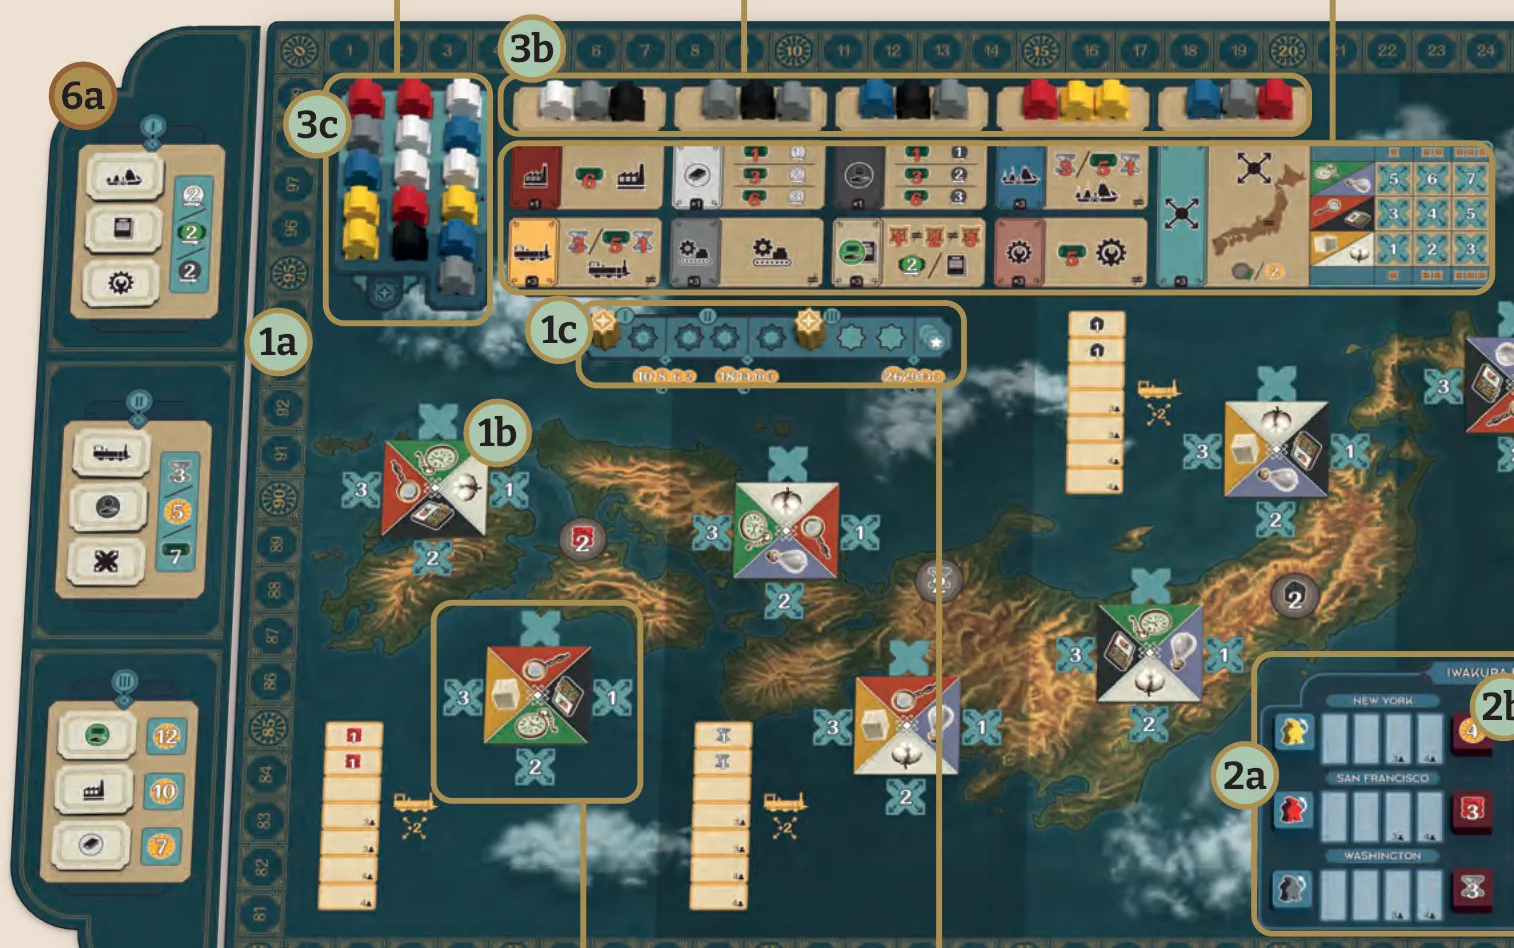
The letters are the rulebook’s own markers on this picture:
- 3b Hiring spaces and actions (top) — nine actions, each below a Hiring space of Workers.
- 3c Worker Queue (left) — refills an empty Hiring space; when it runs dry, the round ends.
- 1c Round track — three Periods, with the Influence payouts printed below.
- 1b Japan — four Regions, each with two Local Markets: a City with a Demand tile and four Influence spaces, plus Train spaces with bonuses. Each Region has its own bonus.
- 2a / 2b Iwakura Mission (right) — six Destinations abroad, each with an Expert Worker and Upgraded Department tokens for whoever sends a Ship.
- 6a Common Goals board (far left) — only with that module.
- [Genro] Cover the Local Markets action with the expansion overlay and add the two selected Genro and their Loyalty boards (setup).
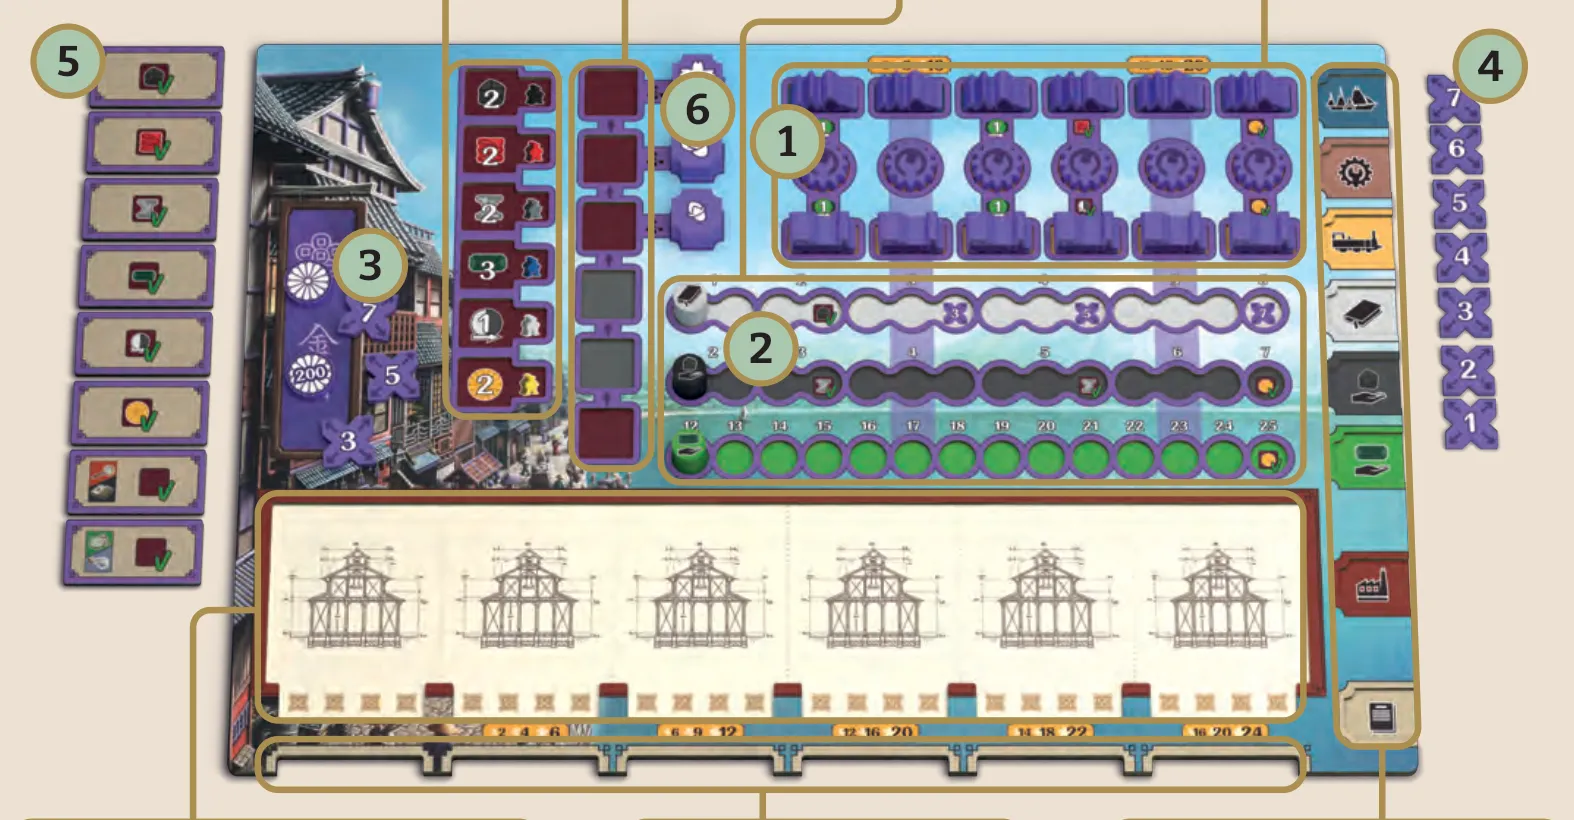
Your Zaibatsu, with the rulebook’s markers where it has them:
- Departments (the column of six coloured bonuses) — your Department bonuses and the Upgraded tokens your Ships bring.
- Workers area (the column of six spaces next to it) — Workers fill it bottom up. 6 marks the three Favor piles beside its top spaces (Consolidation).
- 1 Ships, Machines and Trains (top right) — what you can still build (Ships, Machines, Trains).
- 2 R&D, Mining and Finance — the three tracks, with their markers.
- 3 and 4 Influence tokens — the 3, 5 and 7 to earn on the left, seven ready on the right (Local Markets).
- Factories (the wide band) — six Factory spaces, with Goods below each.
- 5 Contracts (far left) — eight to fulfil; each fulfilled one goes on the strip along the bottom (Investment and Contracts).
- Personal Objectives (the column on the right edge) — where Favor tokens score at the end (Personal Objectives).
A turn
On your turn either act or consolidate. Details.
- Act: take a Worker from above an action and put it in your Workers area (bottom up). Pay for
1–3 activations of that action:
- R&D / Mining — Money to climb a track;
- Factory — Money to build a Factory (needs R&D level);
- Machines — Money to add Machines (more Goods per production);
- Production — Coal to make Goods;
- Ships / Trains — Iron (or Money + Iron) for a Ship abroad or a Train in a Region;
- Local Markets — Goods for Influence tokens in one Region, plus a bonus each time;
- Investment and Contracts — Goods for Finance steps or Contracts.
- [Genro] Local Markets becomes the Genro approval action, with post-action interactions and Period-end Loyalty scoring (Genro rules).
- Consolidate when your Workers area is full, you can’t act, or you choose to: take a Favor token, lose all Money and Coal, gain Department bonuses and income, pay 3 Money per Worker colour, empty the Workers area. Details.
Rehearse the reset: put a few Yen and Coal in the Budget area and two Worker colours in the Workers area. Before touching income, point out which Budget resources will disappear and count the colours for salaries. Use the Consolidation checklist in order; the worker count and colour count answer different questions.
At the end of each turn an empty Hiring space is refilled from the Worker Queue; if it can’t be, the round ends and the next round is refilled from the bag.
How the game ends
- Periods: two rounds in Period I, two in Period II, then round 5 and three final rounds in Period III. Each Period ends with Influence Scoring.
- Trigger: when the Round marker reaches the bright spaces, everyone gets exactly 3 more turns. Then the third Influence Scoring.
- Final scoring: everyone consolidates once more, together. Then Personal Objectives and leftovers. Details.
- Ties: the player who took their last turn latest wins.
Ways to score
| Source | How and when |
|---|---|
| Influence Scoring | End of each Period, per Region: 10/8/6/2, 18/14/10/3, 26/20/14/4 for 1st–4th. Tokens + 2 per Train (with a token there) |
| Region bonus taken as points | Each Local Markets activation: 2  instead of the Region’s Resources |
| Foreign Affairs (yellow) | Department bonus: 2 , or 4 upgraded |
| Personal Objectives | End: each Favor token scores 5/8/10 or 10/16/20 by level and threshold; Factories and Contracts score the number under your rightmost one |
| Leftovers | End: 1 per 3 Goods/Coal/Silk/Iron together, 1 per 5 Money |
| Unpaid salaries | Lose 1 per Money you can’t pay at a Consolidation |
| [Genro] Loyalty | Score the rewards shown on each Genro board after Influence Scoring at each Period end (rules) |
| Starting token A | Your score starts at the number it shows |
What each resource is for
| Resource | Why you need it | How you get it | How you use it |
|---|---|---|---|
 Money | Most actions and salaries | Finance income at Consolidation, blue Department, Region bonus, Silk | R&D, Mining, Factories, Machines, Ships and Trains; 3 per Worker colour in salaries. Lost at every Consolidation |
 Coal | Production | Mining income at Consolidation, black Department, Region bonus | 2/3/4 per production. Lost at every Consolidation |
 Iron | Ships, Trains, second Machines | Grey Department, Region bonus, Train spaces | 3 per Ship or Train (or 1 with 5 Money); 1 for a Factory’s second Machine space |
 Silk | Flexible money | Red Department, Region bonus | 1 Silk = 1 Money any time; 1/3/6 Silk = +1/2/3 R&D level for one Factory. Kept between Consolidations |
| Goods | Influence and Contracts | Production in your Factories (1 + 1 per Machine) | Local Markets (Influence tokens) and Investment and Contracts |
| Workers | Actions, and the Department bonuses you get | One per action; Expert Workers from Ships | Their colours decide your bonuses and your salary bill |
| Influence tokens | Influence Scoring | 7 from the start; 3, 5 and 7 unlocked on your tracks | Placed in the Local Markets with 1–3 Goods of one kind |
| Favor tokens | End-game points | One per Consolidation, from beside your top Worker | On a Personal Objective — choose where you’ll get far |
 Machines | More Goods | Machines action | +1 Good per production in that Factory |
| [Genro] Loyalty tokens | Gain approval and resolve interactions | Take them from a Genro board during Local Markets | Track each Genro’s Loyalty and score majorities at Period end (rules) |
Teaching tips
-
Teach Consolidation early, right after the turn: losing all Money and Coal and paying per Worker colour shapes every decision.
-
Point out the Worker colours: few colours means low salaries; the bottom and top colours pick your Department bonuses.
-
Stress that Trains need a token in their Region, and that later Periods pay far more.
-
First game: all Factories on side A, no modules. Let the last player choose a Starting pair first, as the rules say.
-
[Genro] Start with Legislator and Regulator; they are the WIP rulebook’s suggested first pairing.
-
Before a Ship action, count space for both Workers: the one taken for the action and the Expert Worker gained with the Ship. Practice example.