Actions
The nine actions of Nippon: Zaibatsu — R&D, Mining, Factory, Machines, Production, Ships, Trains, Local Markets, Investment and Contracts — with Department bonuses and action modifiers.
Every action starts the same way: take a Worker from the Hiring space above it (Your turn), then pay and resolve its activations.
| Action | Activations | Cost of each | You get |
|---|---|---|---|
| R&D | 1 | 1 / 3 / 6  | 1 / 2 / 3 steps on R&D |
| Mining | 1 | 1 / 3 / 6 | 1 / 2 / 3 steps on Mining |
| Factory | 1 | 6 | a Factory |
| Machines | 1–3, different Factories | 5 | a Machine |
| Production | 1–3, different Factories | 2 / 3 / 4  | Goods |
| Ships | 1–3, different Destinations | 3  or 5 + 1 | a Ship, an Expert Worker, a Department upgrade |
| Trains | 1–3, different Regions | 3 or 5 + 1 | a Train and its space’s bonus |
| Local Markets | 1–3, one Region | 1–3  of one kind | an Influence token and a Region bonus |
| Investment and Contracts | 1–3 | 1, then 2, then 3 | 2 steps on Finance, or a Contract |
Research
1 activation: spend 1 / 3 / 6 Money to advance 1 / 2 / 3 spaces on the R&D track.
Your R&D level decides which Factories you may build. Spaces on the track unlock your
locked Influence tokens and give Department bonuses.
Mining
1 activation: spend 1 / 3 / 6 Money to advance 1 / 2 / 3 spaces on the Mining track.
The higher your marker, the more Coal you collect at every
Consolidation.
Factory
1 activation: spend 6 Money to build one Factory  .
- Choose a Factory from those on offer. Your R&D level must meet its requirement.
- Put it on the leftmost empty space of the Factories area of your Zaibatsu.
- Apply its immediate effect, if it has one.
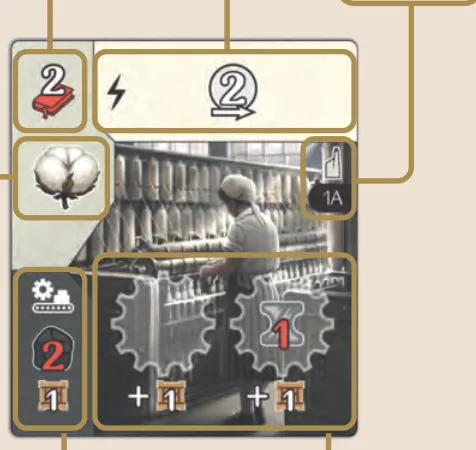
| Level | Factories | R&D needed | To produce |
|---|---|---|---|
| 1 |  Cotton,  Paper | 2 | 2 |
| 2 |  Bento,  Lenses | 4 | 3 |
| 3 |  Bulbs,  Clocks | 6 | 4 |
- Short of the R&D level? Spend 1 / 3 / 6
 Silk to count 1 / 2 / 3 levels higher for this
Factory (Silk).
- You may own several Factories of the same type. You have 6 Factory spaces — no seventh.
- Every Factory face and its effect is listed under Cards & Components.
Factory effects
- Immediate (lightning bolt) — happens once, as you place the Factory. It is free.
- Action modifier (an action icon) — improves that action each time you take it.
- Special (no icon) — a lasting effect, or one that triggers in a given situation.
Action modifiers
You may use the modifier of only one Factory per action — not one per activation, even if you own several Factories with the same modifier. Factory effects are not actions, so they never trigger a modifier.
Machines
1–3 activations, each in a different Factory: spend 5 Money to build one Machine
 .
- Choose one of your Factories with an empty Machine space.
- Put your leftmost Machine on an empty Machine space there. If the space shows an extra cost, pay
it too: every Factory has one free space and one that costs 1 Iron.
Each Machine adds 1 Good to that Factory’s production.
Production
1–3 activations, each in a different Factory: produce in one of your Factories.
- Choose a Factory.
- Spend 2 / 3 / 4 Coal for a level 1 / 2 / 3 Factory.
- Put the Goods on the empty spaces under the Factory: 1 plus 1 per Machine in it.
- A Factory holds at most 4 Goods; any more are discarded.
- A Factory always produces its own kind of Goods. Goods never move between Factories, even of the same type — but you may spend Goods from two Factories of the same type together.
Ships
1–3 activations, each to a different Destination: spend 3 Iron, or 5
Money and 1 Iron, to build one Ship  .
- Choose a Destination in the Iwakura Mission area that still has its Expert Worker.
- Put your leftmost Ship on an empty Ship space there.
- Take that Destination’s Expert Worker and put it on the lowest empty space of your Workers area. If you have no room, you cannot build the Ship.
- Take that Destination’s Upgraded Department token and put it on its space in your Departments area — unless that Department is already upgraded.
- Destinations have 2 / 3 / 4 Ship spaces with 2 / 3 / 4 players.
- Experts go back to the Iwakura Mission when you consolidate, so the same Destination can be reached again later.
- Expert Workers count as ordinary Workers at Consolidation — their colour costs salary too.
Trains
1–3 activations, each in a different Region: spend 3 Iron, or 5
Money and 1 Iron, to build one Train  .
- Choose a Region on the main board.
- Put your leftmost Train on an empty Train space there.
- Gain the bonus printed on that space, if any.
- Regions have 3 / 5 / 7 Train spaces with 2 / 3 / 4 players.
- At Influence Scoring each of your Trains adds 2 Influence in its Region — but only if you have at least one Influence token there. Trains cannot be knocked out.
Local Markets
1–3 activations, all in one Region: serve a Local Market.
[Genro] The expansion covers this action with its overlay and replaces its Influence-token procedure with the approval and Loyalty sequence (Genro rules).
- Choose an Influence space in a Local Market of that Region.
- Spend 1–3 Goods of the kind shown on the side of the City’s Demand tile next to
that space. All Goods for one token are of one kind.
- Put one of your available Influence tokens of the matching value on the space.
- Gain the Region’s bonus — 2 Silk, 2 Iron, 2 Coal or 3
Money, as printed — or 2
 victory points.
| Goods spent | Level 1 Goods | Level 2 Goods | Level 3 Goods |
|---|---|---|---|
| 1 | token 1 | token 3 | token 5 |
| 2 | token 2 | token 4 | token 6 |
| 3 | token 3 | token 5 | token 7 |
Choosing a space
- An empty space takes any token. Ignore the number printed on it.
- An occupied space — yours or another player’s — takes only a token of higher value. The old token goes back to its owner. Equal or lower: you cannot place there.
- You may replace your own tokens, even ones placed in this same action — every activation earns its Region bonus again.
Fewer players
Each Local Market takes at most 2 / 3 / 4 player tokens with 2 / 3 / 4 players; with 2 or 3 you choose which of the 4 spaces to use. When the limit is reached you can still replace a token with a higher one. You can also place on a further empty space if your token beats at least one token in that market — then the market’s lowest token goes back to its owner (the active player chooses between tied lowest tokens).
Investment and Contracts
1–3 activations, each with Goods of a different kind:
- first: spend 1 Good;
- second: spend 2 Goods of another kind;
- third: spend 3 Goods of a third kind.
Each activation gives either 2 steps on the Finance track or one Contract
 :
- Choose one of your Contracts not yet fulfilled.
- Gain its bonus.
- Put it on the leftmost empty Contract space at the bottom of your Zaibatsu (face down if you like). The Factory above that space does not matter.
Two Contracts have a condition: among the Goods spent in this action there must be at least one level-2 Good (or level-3, as the Contract shows). Each of these gives a Department bonus of your choice.
Department bonuses
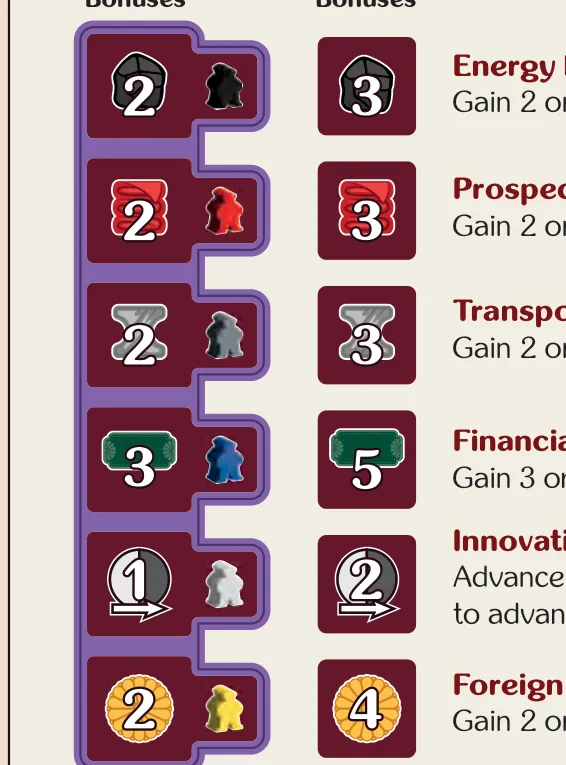
Each Department has a Worker colour. A Department bonus gives the basic amount, or the upgraded amount once you hold that Department’s Upgraded token (from a Ship).
| Department | Worker | Basic | Upgraded |
|---|---|---|---|
| Energy | black | 2 | 3 |
| Prospection | red | 2 | 3 |
| Transportation | grey | 2 | 3 |
| Financial | blue | 3 | 5 |
| Innovation | white | 1 step on R&D or Mining | 2 steps: both on one track, or 1 on each |
| Foreign Affairs | yellow | 2 | 4 |
You gain Department bonuses at Consolidation, from track spaces, from Contracts and from Factory effects.