Teach the Game
A script to read aloud: how you win Tiletum, the boards, a round, the end, every way to score and what each resource and piece is for.
How you win
“We are merchants of the early Renaissance, travelling from Tiletum — today’s Tielt in Belgium — to Venice. Over 4 rounds we draft dice: each die gives Resources of its colour and an Action, and the fewer Resources it gives, the stronger the Action. We take Contracts, build Houses and Cathedral Pillars, house famous Characters and win noble Crests. Most points after the fourth Fair wins — 60 to 100 minutes.”
- You need: points at the four Fairs, fulfilled Contracts, Cathedral tiles, and at the end lots of Houses × Pillars on the map and Completed Buildings on your board.
- You get them by: drafting three dice a round from the Action Wheel — low dice for big Actions, high dice for Resources — and chaining free Tasks and Bonus tiles around them.
The boards
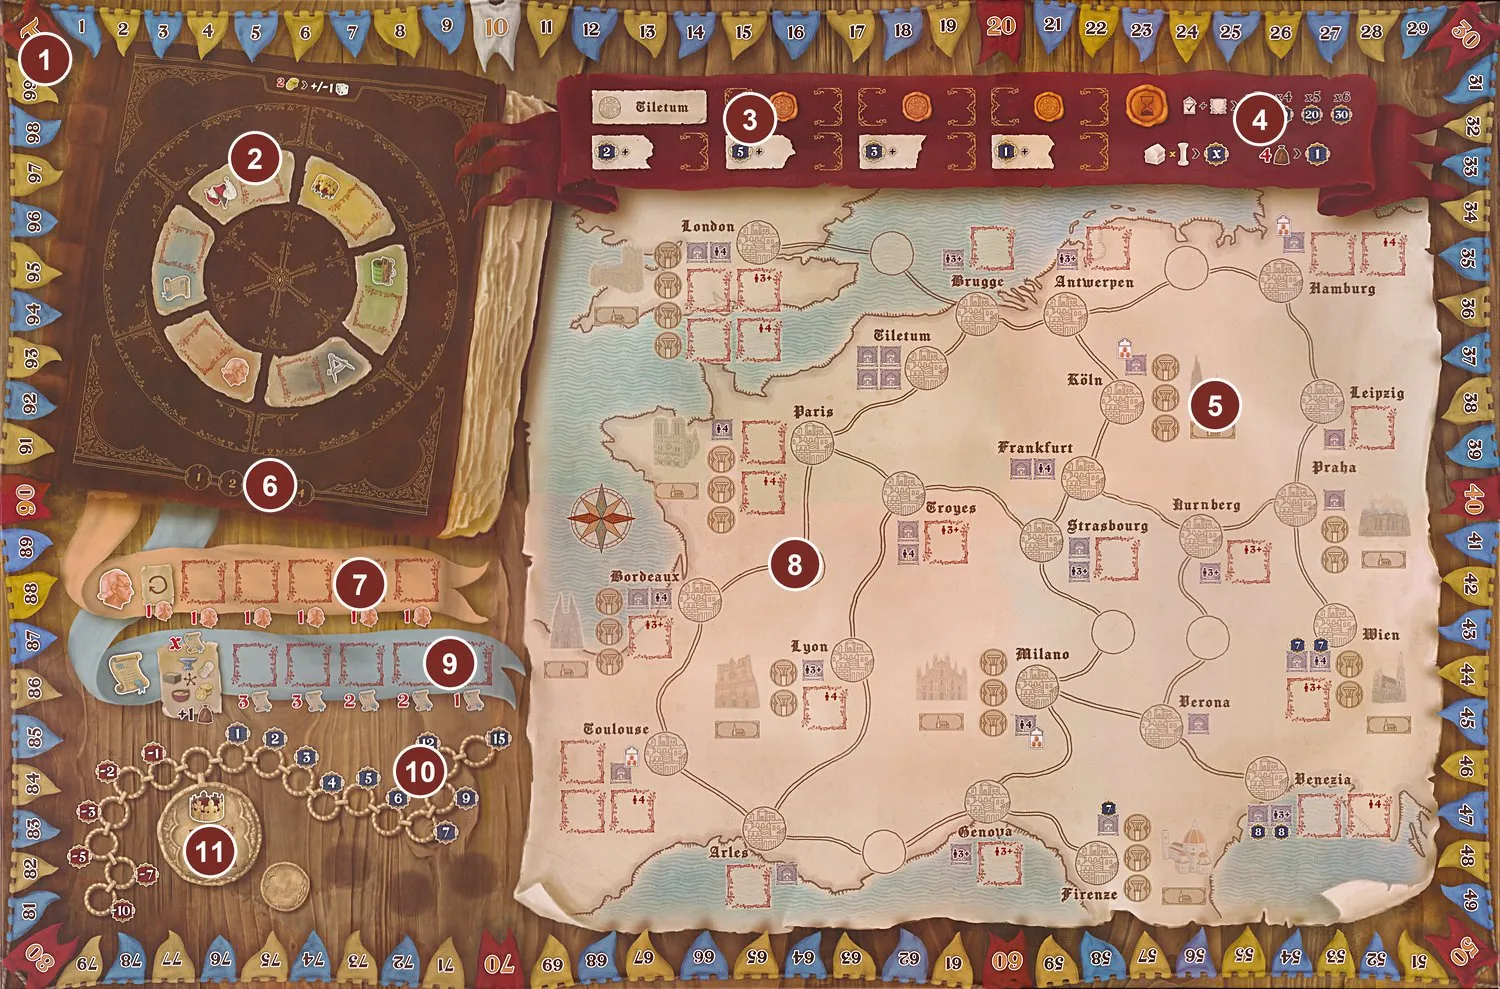
- Score track — you start on 10.
- Action Wheel — dice sit by value; each segment is an Action, with a Bonus tile.
- Fair display — the four Fair Towns and their scoring tiles, round by round.
- Final scoring reminder — Completed Buildings, Houses × Pillars, Resources.
- Cathedral — its tile stack and Construction Cost tile; Pillar spaces beside it.
- Turn Order track — set by the King track every round.
- Character offer — five Characters to hire.
- The map — Towns with House spaces, road spaces, Bonus tiles.
- Contract offer — five Contracts, each costing the AP shown under it.
- King track — red spaces lose points, blue spaces gain them; Corruption drags you down.
- King’s Bonus tile — for whoever is highest on the King track.
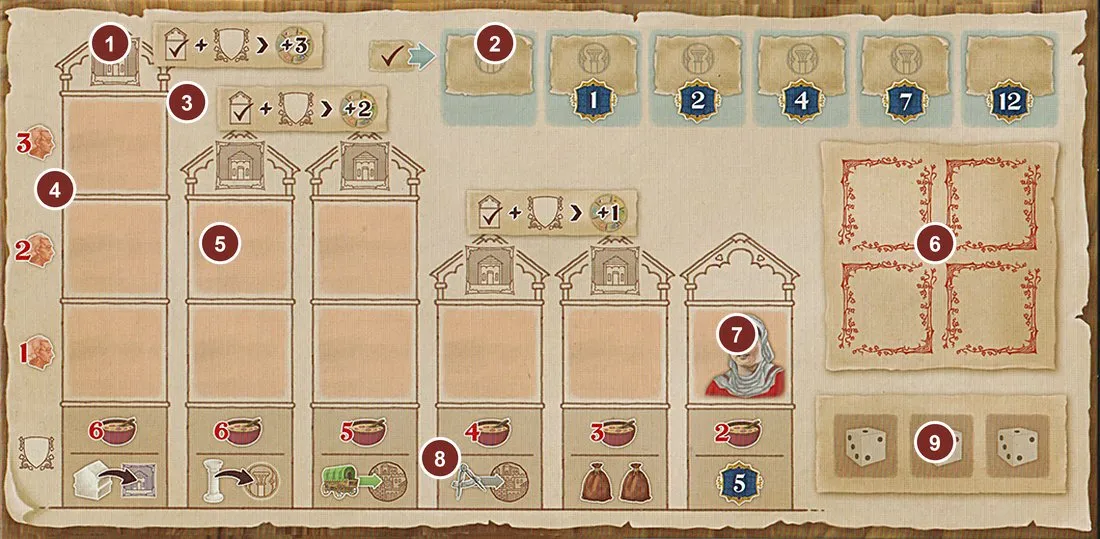
- Roof spaces — a full Building releases its House.
- Contract spaces — each fulfilled Contract releases a Pillar and scores the space.
- Bonus Action Points reminder — Characters + Crest = extra AP for that Action.
- Floors 1–3 — placing a Character costs 1, 2 or 3 AP.
- Buildings — one type of Character per Building.
- Storehouse — four spaces; every tile passes through here.
- The pre-printed Building — already full; it gives no Action bonus.
- Crest spaces — pay Food, take the bonus.
- Die spaces — your three dice of the round.
A round
Each of the 4 rounds (full rules):
- Preparation — roll 8 / 11 / 14 dice (2 / 3 / 4 players) onto the Action Wheel by value.
- Action — three laps; on your turn take a die, its Resources (number = value, type = colour) and its Action with 7 minus the value Action Points. Pay 2 Gold per +1/−1 to change a die first. Do free Tasks whenever you like. The first player flips a Corruption token at the start of each lap.
- King — the top of the King track takes the Bonus tile; everyone scores their space; new turn order; red markers go back to 0.
- Fair — whoever has a House or the Merchant in the Fair Town scores (board + tile) × condition.
- Cleanup — refill wheel Bonus tiles, new Corruption tokens, turn the wheel one step clockwise.
The six Actions:  Architect (move, Pillars, tiles),
 Merchant (move,
Houses, tiles),
 Character (hire and house Characters),
 Contract (take
Contracts, swap Resources),
 King (climb the King track),
 Joker (any one of
these). The Tasks: buy Resources with Gold, fulfil Contracts, place Crests, build Cathedrals, use
Helpers (Actions and Tasks).
How the game ends
- After the fourth Fair (details).
- Then: Houses × Pillars on the map; Completed Buildings (3 / 4 / 5 / 6 = 5 / 10 / 20 / 30); 1 per 4 Resources left.
- Ties: the tied player earlier in turn order wins.
Ways to score
| Source | How and when |
|---|---|
| Fairs | Each round: (board number + Fair tile number) × times you meet the tile’s condition, with a House or your Merchant in the Fair Town |
| King track | Each King phase: your space’s value (blue gains, red loses); the leader takes a Bonus tile, or 4  in round 4 |
| Contracts | When fulfilled: the tile’s plus the Contract space’s 0–12 |
| Cathedrals | When built: Construction Cost tile + Cathedral tile |
| Houses | Some House spaces print |
| Crests | The 2-Food Crest space gives 5 |
| Characters and Helpers | Some give when placed or used |
| Houses × Pillars | End: Houses on the map times Pillars on the map |
| Completed Buildings | End: 3 / 4 / 5 / 6 of them = 5 / 10 / 20 / 30 |
| Leftover Resources | End: 1 per 4 |
| Losses | Red King track spaces at each King phase; Fair tile 4 can cost points |
[Silver] Mines, Silver and Technology tiers add points, and the Scoring overlay changes Houses × Pillars (Prospect for Silver).
What each resource is for
| Resource | Why you need it | How you get it | How you use it |
|---|---|---|---|
 Gold | Flexibility | Yellow dice, Helpers, Characters | 2 Gold = any Resource, or ±1 on a die; “any” in Contracts |
 Wool and  Iron | Contracts | Light grey and blue dice, Characters | Pay Contracts |
 Stone | Cathedrals | Dark grey dice, Characters | Build a Cathedral where you have a Pillar |
 Food | Crests | Pink dice, Characters | Place a Crest under a Building (2–6 Food) |
| Dice | Your three turns a round | The Action Wheel | Low = strong Action; high = many Resources |
| Bonus tiles | Free extras | The wheel (free), the map (1 AP), the King track | Helpers once; Crests and Contracts as tiles |
| Characters | Bonuses, Houses, AP bonuses | Character Action | Fill a Building: release its House; with a Crest, extra AP forever |
| Houses | Fairs, House × Pillar | Roofs of full Buildings | Merchant Action, Crest space |
| Pillars | Cathedrals, House × Pillar | Fulfilled Contracts release them | Architect Action, Crest space |
| Crests | Complete Buildings, Crest bonuses | Bonus tiles, Contract offer | Pay Food to place one |
| King track | Turn order, points, a Bonus tile | King Action | Stay out of the red part |
Teaching tips
- Teach the die first: “value = Resources, 7 − value = Action Points”, and show it on the wheel.
- Then the player board left to right: Characters fill Buildings, Buildings release Houses, Contracts release Pillars — that is where Houses × Pillars comes from.
- Point at the four Fair Towns before the first die is taken: everyone should plan to be there.
- Stress that Tasks are free and can interrupt your Action, and that tiles always pass through the four-space Storehouse.
Rehearse four Action Points
Use Blue’s Architect example: take a value-3 die from the Architect Action. Gain three Resources of its colour and take four Action Point counters. Starting in Frankfurt, spend one to reach Nurnberg, one to collect its Bonus tile into an empty Storehouse space, one to reach Prague and one to place an available Pillar there. Prague must have an empty Pillar space and none of your Pillars already present.
Ask: ‘Have I built the Cathedral?’ No. Placing the Pillar and paying to build the Cathedral are separate steps.